
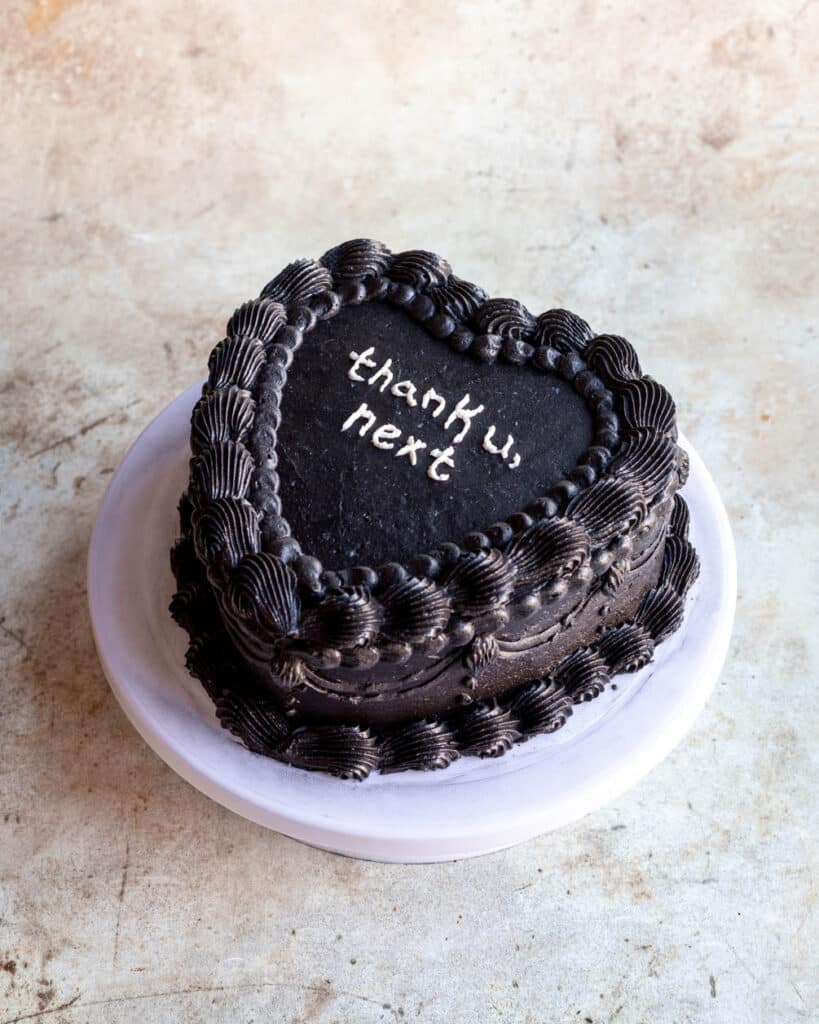
A gorgeous, deep black vintage heart cake is the perfect way to celebrate endings – whether it’s an end of a decade and the start of another or perhaps a breakup or divorce. Whatever your somber celebration needs are, let there be cake!
This page may contain affiliate links. This means I may get a small commission if you purchase through these links, at no additional cost to you.
I recently made my first vintage heart cake for a breakup party. If you haven’t thrown yourself a breakup party before, I highly recommend. It’s fun and cathartic. The cake has 3 components:
- Black cocoa chocolate cake
- Black cocoa swiss meringue buttercream
- Fresh raspberries
How to make black cocoa chocolate cake
For the chocolate cake base, I use my favorite recipe from Sally’s Baking Addiction, and I use black cocoa instead of regular cocoa.
Some notes on proportions:
- I made an approximately 6 inch cake. I say approximately, because I did not have 6 inch pans with me at my Airbnb. Instead, I poured the batter on a half sheet tray and cut out the heart shape.
- Filling the half sheet tray takes about 3/4 of the recipe
- If you are using round 6 inch pans, you would only need 1/2 the recipe, because there is less waste from trimmings
How to make black swiss meringue buttercream
Making black buttercream was quite the experience. I wanted the final cake to be a deep, rich black, not dark grey. It was a pain, but we got there.
I used the chocolate meringue buttercream recipe from Sugar Geek Show, with a few modifications:
- Salted butter instead of unsalted butter
- Skipped the 1/2 tsp of salt, since the butter was salted
- 90g of black cocoa powder instead of 113g of chocolate
In terms of proportions, I thought this was the perfect amount of buttercream to frost and decorate my 6 inch heart cake.
Don’t forget to set aside a small portion of uncolored buttercream for writing before you go crazy with the dye.
Tips to get a true black swiss meringue buttercream
- Use black cocoa powder in the buttercream base. It’s much easier than going from a plain white base
- I’ve also heard that adding a little bit of red or dark blue to the base before adding black can also helped. Personally, I have not tried this.
- Use a high quality gel food dye, or a fat soluble powder dye
- After adding the dye, the buttercream will likely still look dark grey. Take about 1/4 of the buttercream, place it in a bowl, and microwave it. The color will darken significantly. Add the microwaved portion back into the bowl
- I will be honest that I got so impatient with the process, I melted my entire bowl of icing over a bowl of steaming water. I then cooled it down and rewhipped it. It did help intensify the color quite a bit, but I wouldn’t recommend it since meringue-based buttercreams are fairly delicate. It worked for me, but I’m not 100% sure it would work all the time.
- Make the buttercream 1 – 2 days ahead of time. The color will deepen over time as the dye disperses throughout the buttercream.
- Serve at room temperature. As the icing warms from the fridge, the color will deepen
How to assemble and decorate a vintage heart cake
Here’s how I assembled my cake:
- Cut out a heart template from a piece of paper. I do this by folding the paper in half, and cutting out half a heart so it’s symmetrical
- Use the template to cut out 3 heart pieces from the larger sheet cake. You may need to trim your template so all 3 pieces fit. My 3rd piece wasn’t large enough, so I used scraps to fill in the lobes of the heart. It worked great.
- Wrap the cake layer in plastic wrap, and place in the freezer. They are easier to work with when very cold.
- To assemble the cake, I put one layer down on a turning cake stand. I pipe a layer of buttercream, fill with raspberries, then pipe a little more buttercream. The next layer goes on top. More buttercream and raspberries, then I finish with the final layer
- If you have a cobbled together layer, it should be the one that goes in the middle
- Crumb coat the cake – Put a thin layer of buttercream all around. Place the cake in the freezer for minimum 20 minutes for the edges to set up
- Evenly frost the crumb coated cake. I use an offset spatula for the top, and a flexible scraper to even out the sides
- The bottom and top of the sides don’t need to be perfect, as you’ll cover them with an icing border
- Pipe your designs. I only had 2 piping tips, so here’s the design I landed on
- Large border on top and bottom of the cake using a French star piping tip
- To get a clean border, I pipe at a 45 degree angle, first pushing back a little before pulling forward to taper into a point
- Smaller borders of small circles using a small round piping tip
- Drapes along the side. I didn’t have a tiny round tip, so I just cut a very small hole in the plastic piping bag. It wasn’t ideal, but it worked.
- Large border on top and bottom of the cake using a French star piping tip
These were the tools that I used:
- Flexible scraper
- Round spinning cake stand
- Piping bags
- Large French star piping tip
- Small round piping tip
Want to save this recipe?
Black Vintage Heart Cake
Equipment
- Offset spatula
- Large French Star piping tip (1 cm)
- Small round piping tip (5mm)
- Cake turn table
- Flexible bench scraper
- Stand mixer with whisk attachment
- spatula
- large bowl
- Half sheet tray
Ingredients
Chocolate Cake (adapted from Sally's Baking Addiction)
- 165g (1 1/3 cup) all purpose flour
- 260g (1 1/3 cup) granulated sugar
- 1 1/2 tsp espresso powder
- 1 1/2 tsp baking soda
- 3/4 tsp baking powder
- 48g (1/2 cup) black cocoa powder
- 3/4 tsp salt
- 135g (1/2 cup) full fat sour cream, room temperature
- 85g (1/3 cup) neutral flavored oil
- 1 egg, room temperature
- 1 egg yolk, room temperature
- 90g (1/3 cup) buttermilk, room temperature
- 90g (1/3 cup) hot water or black coffee
Black Cocoa Swiss Meringue Buttercream (adapted from Sugar Geek Show)
- 227g egg whites (about 7 large egg whites)
- 454g (2 1/4 cups) granulated sugar
- 680g (48 tbsp, or 6 standard sticks) salted butter, softened but not fully room temperature
- 90g (3/4 cup) black cocoa powder
- black gel food dye, or black powder fat soluble food dye
For the filling
- 700g (2 pints) raspberries
Instructions
Make the cake
- Preheat the oven to 350F and line your half sheet tray with parchment paper
- Whisk together flour, sugar, cocoa powder, espresso powder, baking soda, baking powder, and salt
- In a separate large bowl, whisk together sour cream, oil, eggs, and buttermilk until combined
- Sift the dry ingredients into the wet ingredients Add the hot water or coffee. Whisk gently until just combined.
- Pour into your baking tray. Place in the middle rack of the oven and bake for about 20 – 25 minutes until a toothpick comes out clean
- Let cool completely before removing from the pan. To remove, run a knife along the edges of the pan, then turn upside down onto a clean surface and peel off the parchment paper
- Cut out a heart-shaped stencil from a piece of paper. Make sure that the stencil is sized so that you can cut 3 heart pieces out of the sheet tray. If you can't fit 3 pieces perfectly, you can use scraps to piece together one of the layers. Just make sure it's in the middle of the cake.
- Cut out the heart-shaped cake layers. Wrap in plastic, and place in the freezer until firm, at least 1 – 2 hours.
Make the buttercream
- Place your egg whites and sugar into the mixing bowl of your stand mixer
- Bring 2 inches of water to a boil in a small pot, then reduce heat to low so the water is simmering. The mixing bowl with the egg whites should be able to rest on the pot, without the bottom touching the water. Place the bowl on top of the pot, and whisk the egg whites and sugar until the sugar dissolves. When you rub the whites between your fingers, you should not feel any granules of sugar
- Use a whisk attachment to whip the egg whites on high to stiff peaks
- Reduce speed to low, and slowly add small pieces of the softened butter. The butter should be soft, but still a little firm. If it's too warm, the buttercream will curdle. Keep mixing until the buttercream is homogenous
- Remove and reserve a small amount for piping words later on
- Add the black cocoa powder and black food dye
- Increase speed to high, and whip until everything is homogenized. Take 1/4 of the buttercream, and microwave for 10 – 15 seconds until melted. You should see the black color intensify. Add more black gel dye to the microwaved buttercream if needed
- Add the warmed up buttercream back to the main batch, and whip on high until light and fluffy. The color should be a dark charcoal at this point. It's okay if it's not completely black
- Let the buttercream sit for a few hours or overnight for the color to darken to a true black. If it has cooled down and solidified, whip it back up before frosting
Assemble the cake
- Remove the cake from the freezer, and place one layer on a cake board on a rotating cake stand
- Pipe on a layer of butter cream. Cover with raspberries, and spread with a thin layer of additional buttercream
- Place another layer of cake on top. Repeat piping on a layer of buttercream, raspberries, and more buttercream
- Place the final layer of cake on top. Cover the entire cake with a thin layer of buttercream to seal in any crumbs. Place in the freezer for at least 20 minutes so that the crumb coat sets up
- Use an offset spatula to put a final layer of buttercream on the cake. Smooth out the sides with a bench scraper
- Use the piping tips to pipe the design. I do a top and bottom border with the large French star tip, and smaller accent borders with the small round tip. To make drapes on the sides, I cut a small hole in the piping bag.
- Use the white buttercream you saved from earlier to pipe on any words
- Store in the fridge, and bring out to room temperature 1 – 2 hours before serving. Letting the cake come to room temperature will further intensify the black color
Notes
- Day 1 – make the cake layers, and make the buttercream. Freeze the cake layers overnight, and let the buttercream rest so that the color intensifies
- Day 2 – whip the buttercream back up, and assemble the cake