
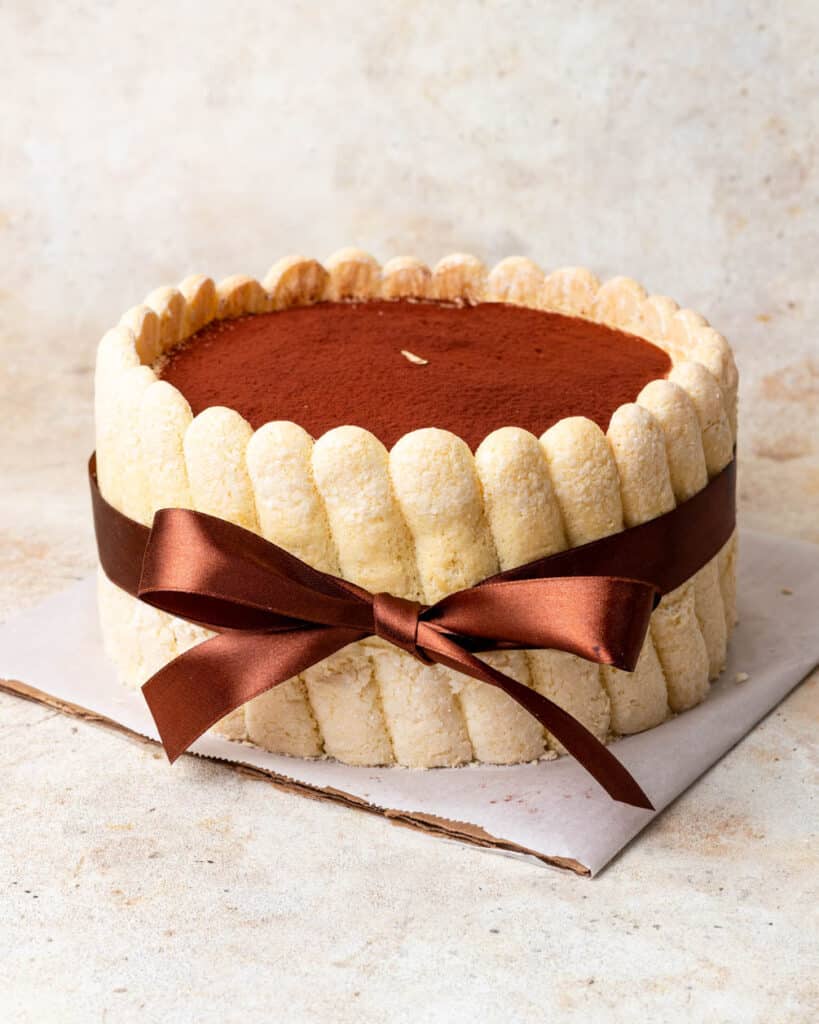
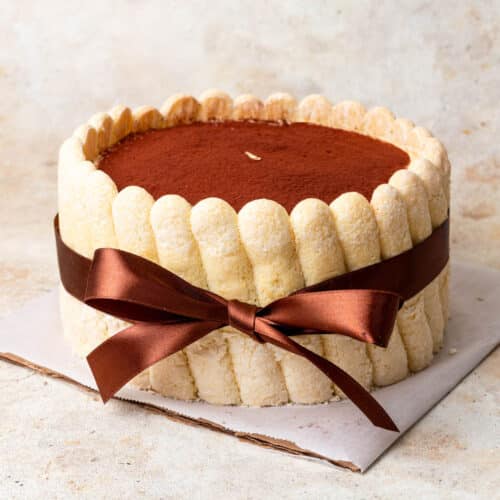
This Tiramisu Charlotte Cake is a stunning dessert and my go-to for birthdays and celebration events. It’s made with homemade ladyfingers, coffee syrup, and mascarpone mousse.
This page may contain affiliate links. This means I may get a small commission if you purchase through these links, at no additional cost to you.
It’s also a great recipe for practicing 3 key French pastry skills:
- Making light and fluffy egg-leavened sponges
- Making mousse
- Assembling and finishing cakes
What is a Charlotte Cake?
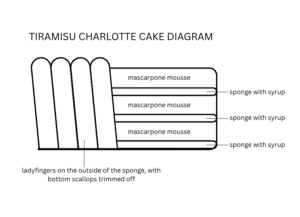
A Charlotte Cake is a dessert made with a light sponge and filled with a cream and mousse. The sponge is often ladyfingers, or biscuit cuillere in French.
For a classic and beautiful finish, the ladyfingers are often arranged around the outside of the cake.
How to make the ladyfinger sponge (biscuit cuillére)
Ladyfinger sponge can be a bit tricky, but it’s definitely doable for home bakers. If you’re a beginner at making ladyfingers, I highly recommend you read my post with a detailed guide with tips and tricks for perfect ladyfingers.
Prep your template
For this Charlotte Cake, the ladyfingers will be piped in specific shapes. You will need an outer ring of diagonal ladyfingers, and 3 round layers for the middle of the cake.
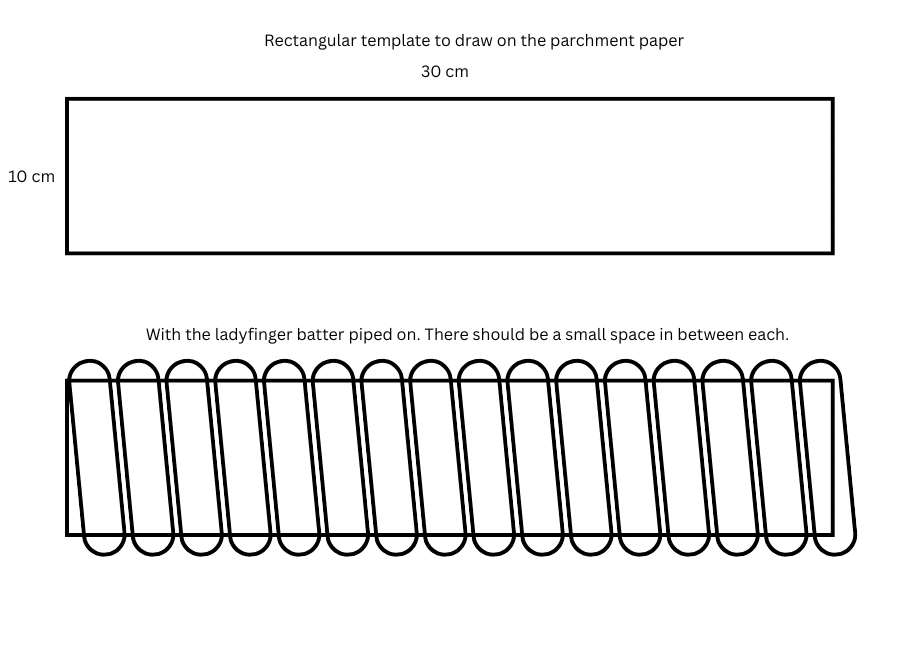
Prep your template – Start by drawing a template on parchment paper. You will need the following:
- One half sheet tray that has two 10cm x 30cm rectangles. These are for the outer ring.
- One half sheet tray with two 18cm diameter circles
- One half sheet tray with one 18cm diameter circles
If you have larger trays, you may only need 2 trays in total.
I draw the template with marker, and then flip over so I pipe on the side without marker. The marks will show through the parchment paper, providing a guide without getting on your cake.
Make the batter
The batter starts with a French meringue. You then add your egg yolks one by one, and fold in the flour
- Place the whites in your mixing bowl, and mix on medium-high speed with the whisk attachment until soft peaks form. The whites will form small, dense bubbles, and the whisk will leave trails behind as it spins.
- While the mixer is going, add the sugar a little at a time. You will notice the bubbles start to smoothen and tighten up, taking on a glossier sheen
- Mix on high speed until stiff peaks form. At stiff peaks, the egg whites will look glossy and thick, and will hold their shape without sagging or drooping.
- With the mixer still running on high speed, add the egg yolks one at a time until they are fully incorporated. The result should be thick and fluffy, with a pale yellow color.
- Fold the flour into the eggs in 3 – 4 batches. Make sure to sift the flour
- Fold until the flour is incorporated, without large dry pockets. When folding, be careful not to squash out the air. I move my spatula in a J motion, going down and then turning up and over. It helps to rotate the bowl as you fold.
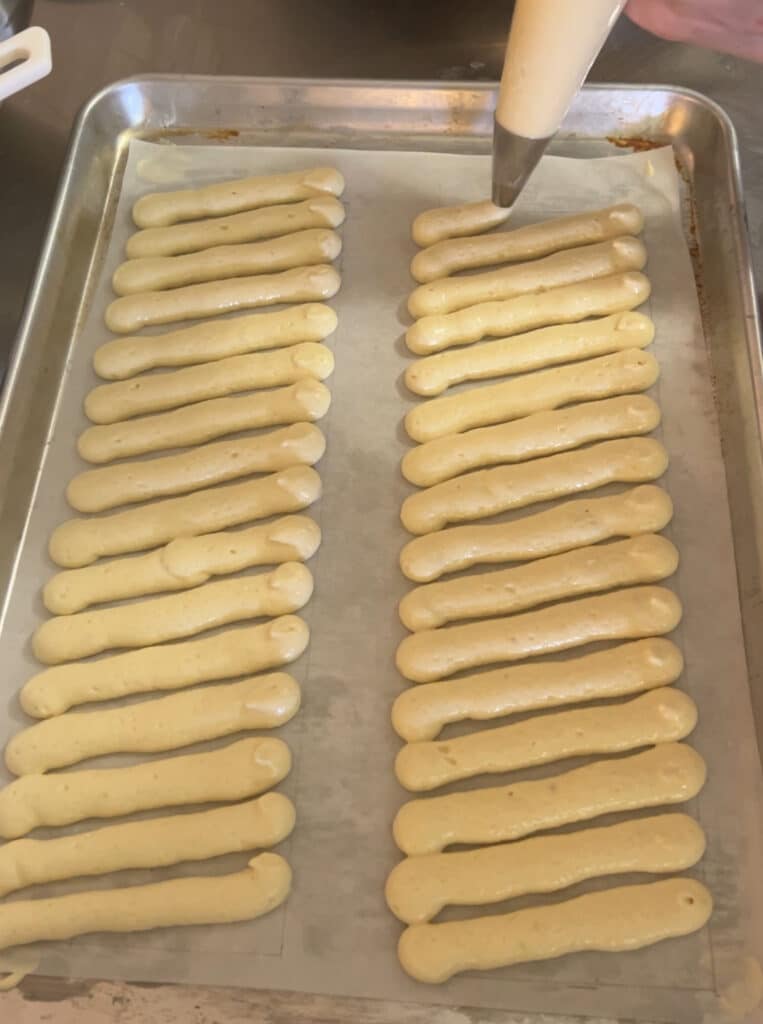
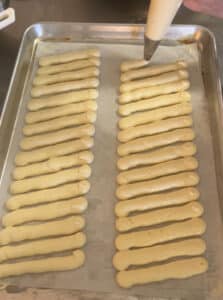
Pipe the batter onto your template
Fill your piping bag with batter, being careful not to press out the air.
Please note that the sponge will spread a little bit in the oven.
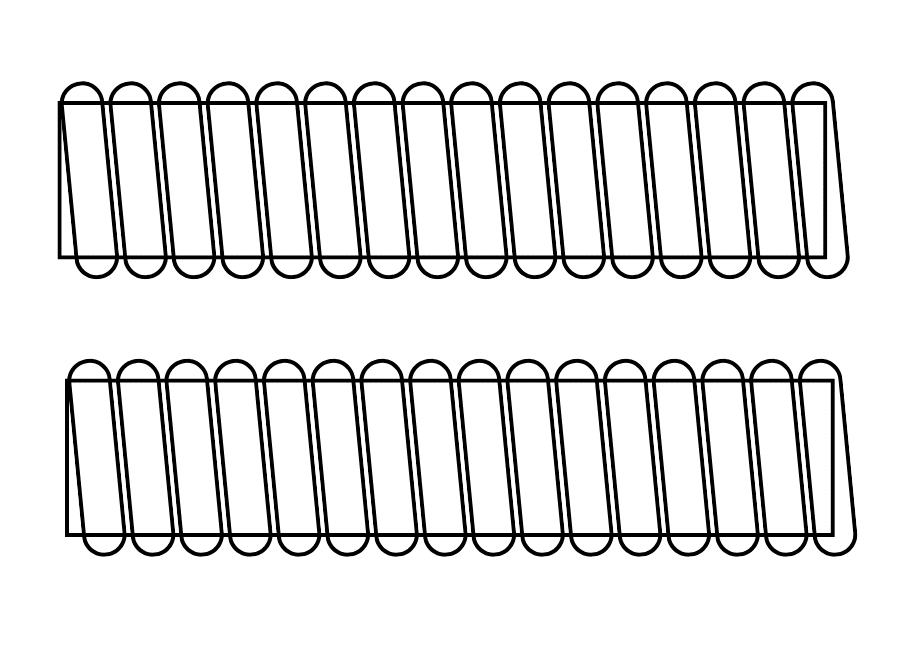
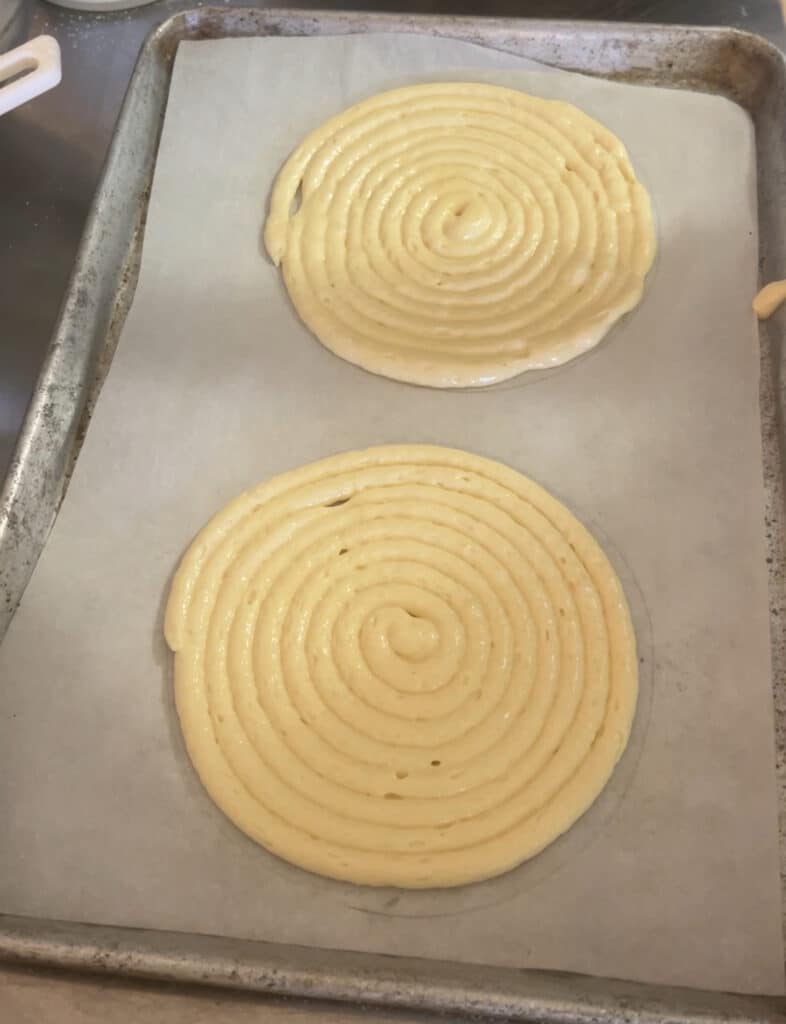
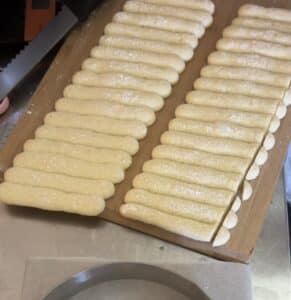
For the outer ring, pipe diagonal lines along your rectangular template. They should poke out a little over the edges. Make sure to leave a small amount of space between each one. Your tray should look like the images below:
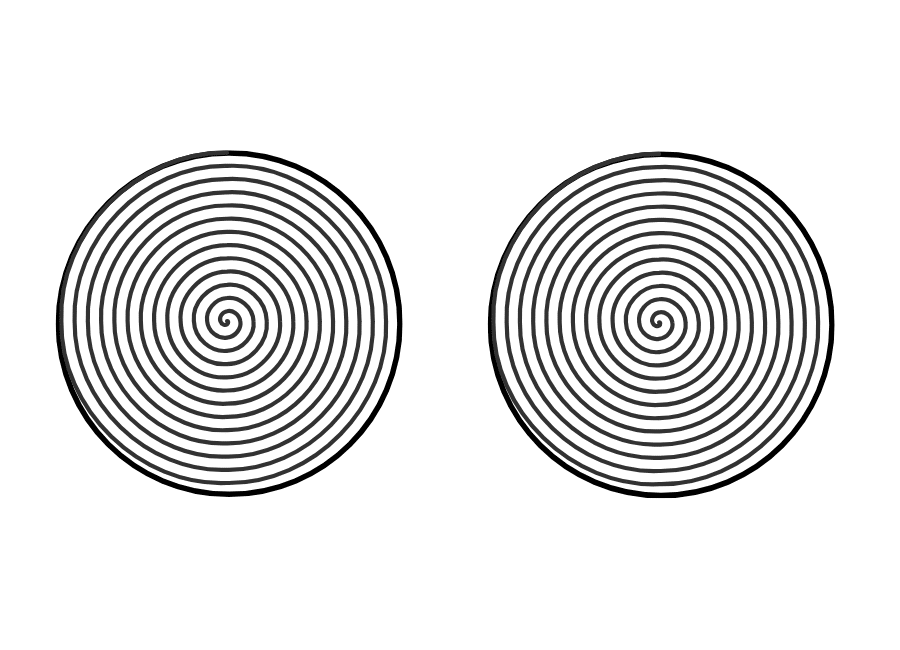
For the circular layers, pipe in a spiral motion starting from the center of the circle and moving outwards. YOU WILL NEED 3 OF THESE. A half sheet tray can fit two of these circular sponges. The batter should form one continuous circle – no need to leave any gaps. It will look like the second image below.
How to make mascarpone mousse
The mascarpone cream is made with a fluffy egg yolk and sugar syrup mixture, mixed with mascarpone and lightened with whipped cream.
- Make a sugar syrup – heat up water and sugar to 239F to create a sugar syrup. The syrup helps pasteurize the egg yolks. You will need a food or candy thermometer for this step – I like to use this one.
- Whip the egg yolks – whip the egg yolks with the hot sugar syrup on high speed, until they become thick and fluffy and fall off the whisk in ribbons
- Add the yolks to the mascarpone – add the yolks to the mascarpone, and combine until smooth
- Add gelatin – add gelatin to the mascarpone mixture to help stabilize the mousse. This helps provide a firmer texture and a cleaner slice
- Whip the cream – Whip the cream to stiff peaks
- Fold in whipped cream – fold in the whipped cream, being careful not to deflate the air
How to make coffee syrup
The coffee syrup is quite simple and consists of hot black coffee, sugar, and instant espresso powder. I like to use espresso powder to add a very concentrated coffee flavor without any additional liquid. Feel free to substitute with a shot of espresso if that’s easier.
You simply mix everything together until the sugar dissolves.
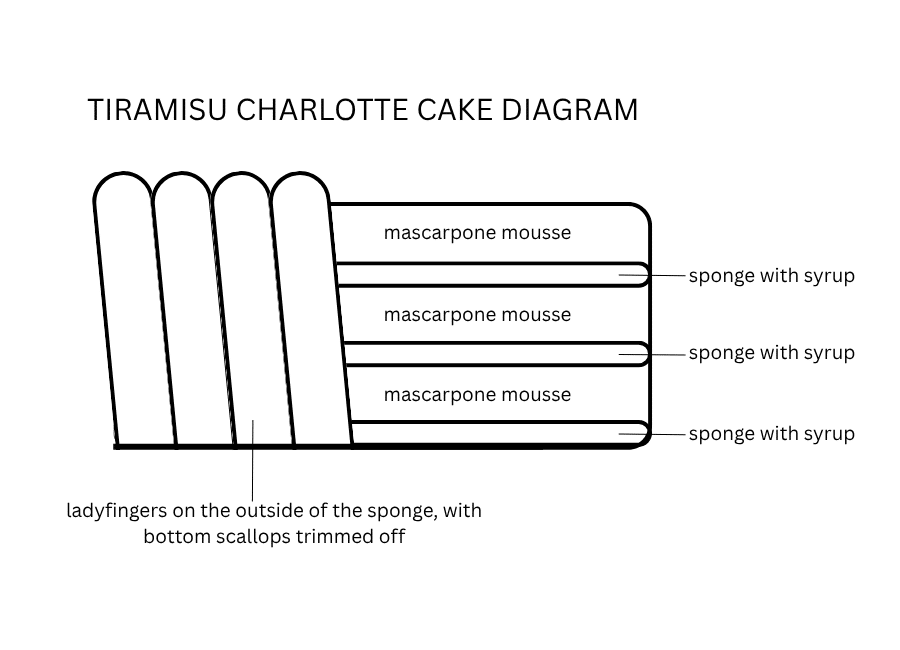
How to assemble the Tiramisu Charlotte
Time for the fun part – assembly! All of your hard work comes together into a beautiful tiramisu
I like to prep my sponges before I start making the mousse. The mousse starts setting after the gelatin is added, so it’s best to work fast
- Prep your cake board and cake ring – have your 10 inch cake board and 8 inch cake ring ready to go. The cake ring will help hold the charlotte together as the filling sets
- Trim the ladyfinger spongesfor the sides of the Charlotte:
- At this point, you should have two rectangular pieces for the side of the Charlotte
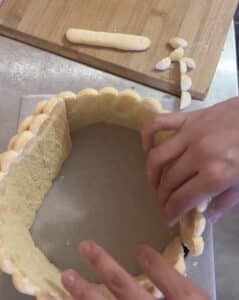
- Slice off one of the scalloped edges of each of the pieces, so they can stand flat against the cake board
- Start lining the rectangular pieces along the inside of the cake ring. One piece should fit entirely, and the other piece will need to be trimmed
- Trim the excess ladyfingers off the second piece, making sure to cut along the diagonal so that it fits neatly against the first piece. If you’re not sure about the fit, it’s better to trim a little at a time and keep testing to see if the second piece will fit in the ring
- Place the two rectangular pieces inside the cake ring. They should fit snugly against each other. The side of the ladyfingers that was covered in powder sugar should be facing outwards
- Trim the circular ladyfinger sponges for the layers of the Charlotte & place the bottom
- At this point, you should have 3 circular pieces for the layers of the Charlotte
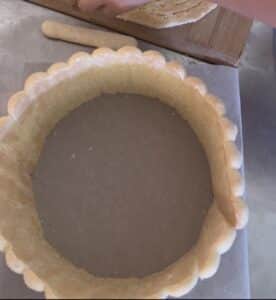
- They should fit snugly against the sides of the cake
- Trim any excess off the sides until they fit snugly
- Place one of the sponges at the bottom of the cake. At this point, your cake should have the sides and bottom assembled. It’s now ready to be filled with mousse
- Make the mascarpone mousse
- Put it all together!
- Generously brush the bottom layer of sponge with 1/3 of the syrup. It should be a dark brown and saturated
- Place 1/3 of the mousse on top of the first layer of sponge
- Place the second sponge on top of the mousse. Brush with syrup.
- Place 1/3 of the mousse on top of the second layer of sponge
- Place the third and final sponge on top of the mousse. Brush with syrup
- Place the remainder of the mousse on top of the third sponge and smooth with an offset spatula
- Place in the fridge to set for at least 1 hour. Remove the ring once the cake is set. If you leave the ring on for too long, it will form condensation on the sides of the cake.
- Right before serving, dust with cocoa powder
Want to save this recipe?
Tiramisu Charlotte Cake
Equipment
- Hand mixer or stand mixer (with whisk attachment)
- large bowl
- spatula
- Piping bag
- Round piping tip (12mm)
- 3 Half sheet baking trays
- Parchment paper
- Ruler
- Candy thermometer
- Serrated knife
- 8 inch (20 cm) cake ring
- 10 inch (25 cm) cake board
Ingredients
Ladyfingers
- 180g (1 1/2 cups) All purpose flour
- 120g Egg yolks (about 6 medium egg yolks)
- 180g Egg whites (about 6 medium egg whites)
- 180g (3/4 cup + 2 tbsp) Granulated sugar
- 50g (1/4 cup) Powdered sugar, for dusting
Coffee syrup
- 150g (2/3 cup) Black coffee (hot)
- 72g (1/3 cup) Granulated sugar
- 3g (1/2 tbsp) Instant espresso powder
- 4g (1 tsp) vanilla extract
Mascarpone mousse
- 80g Egg yolks (about 4 medium egg yolks)
- 120g (1/2 cup + tbsp) Granulated sugar
- 50g (1/4 cup) Water
- 300g (10.5 oz) Mascarpone
- 460g (2 cups) Heavy cream
Gelatin for the mousse
- 9g (2 1/2 tsp) Powdered gelatin (225 bloom)
- 54g (1/4 cup) Water
For dusting
- 30g (2 tbsp) cocoa powder
Instructions
Prep work (mise en place)
- Preheat the oven to 400F
- Draw the ladyfingers templates on parchment paper (see the post for diagrams): 1 half sheet tray with 2 rectangles measuring 10 cm x 30cm1 half sheet tray with 2 circles measuring 18cm in diameter1 half sheet tray with 1 circle measuring 18cm in diameter
- Separate your eggs and measure out your ingredients. Once your baking and assembling, things can move quickly so it's good to have the ingredients measured out beforehand.
- Prepare your piping bag with a 12 mm tip
Make the ladyfinger batter
- Place the egg whites in your mixing bowl, and mix on medium-high speed with the whisk attachment until soft peaks form. The whites will form small, dense bubbles, and the whisk will leave trails behind as it spins.
- While the mixer is going, add the sugar a little at a time. You will notice the bubbles start to smoothen and tighten up, taking on a glossier sheen
- Mix on high speed until stiff peaks form. At stiff peaks, the egg whites will look glossy and thick, and will hold their shape without sagging or drooping.
- With the mixer still running on high speed, add the egg yolks one at a time until they are fully incorporated. The result should be thick and fluffy, with a pale yellow color.
- Fold the flour into the eggs in 3 – 4 batches. Make sure that the flour is sifted
- Fold the egg whites with the flour until the flour is fully incorporated, without large dry pockets. When folding, be careful not to squash out the air and do not overmix. I move my spatula in a J motion, going down and then turning up and over. It helps to rotate the bowl as you fold.
- Fill the prepared piping bag with batter
Pipe and bake the ladyfingers
- For the outer ring of the Charlotte, pipe diagonal lines along your rectangular template. They should poke out a little over the edges of the rectangle. Make sure to leave a small amount of space between each ladyfinger, as they will spread and merge together in the oven.

- For the 3 circular layers, pipe in a spiral motion starting from the center of the circle and moving outwards


- Dust the tops of the ladyfingers with powdered sugar
- Bake each tray of ladyfingers at 400F for 9 – 10 min until browned and the sponge springs back when you lightly press it with your finger
Make the coffee syrup
- Mix together the hot coffee, granulated sugar, instant espresso powder, and vanilla extract until the sugar has completely dissolved
Trim the ladyfingers
- Prep your cake board and cake ring. The 8 inch cake ring should sit in the middle of the 10 inch cake board. The cake ring will help hold the Charlotte together as the filling sets
- For the rectangular pieces, use a serrated knife to slice off one of the scalloped edges of each of the pieces, so they can stand flat against the cake board

- Start lining the rectangular pieces along the inside of the cake ring. One piece should fit entirely, and the other piece will need to be trimmed

- Trim the excess ladyfingers off the second piece, making sure to cut along the diagonal so that it fits neatly against the first piece. If you’re not sure about the fit, it’s better to trim a little at a time and keep testing to see if the second piece will fit in the ring
- Place the two rectangular pieces inside the cake ring. They should fit snugly against each other. The side of the ladyfingers that was covered in powder sugar should be facing outwards

- Trim the circular ladyfinger sponges so that they fit snugly against the sides of the cake
- Place one of the sponges at the bottom of the cake. The side that was touching the parchment paper should be facing up, which will make it easier to absorb syrup. At this point, your cake should have the sides and bottom assembled. It’s now ready to be brushed with syrup and filled with mousse


Make the mascarpone mousse
- Combine the sugar and water in small sauce pan over medium heat and stir until the sugar dissolves. Bring to a boil and heat until a food thermometer registers 239F. Make sure the thermometer is not touching the bottom of the pan
- While the sugar is heating, beat the egg yolks with a hand mixer or stand mixer fitted with the whisk attachment on low speed
- When the syrup is ready, pour it down the side of the bowl into the yolks and beat at high speed until the mixture cools to room temperature, about 10 minutes. When pouring the syrup, the mixer should still be running. The egg yolks will be pale and fluffy, and fall off the whisk in ribbons
- In a large bowl, whip the cream until it reaches stiff peaks
- Whisk the mascarpone in a large bowl until smooth. Add a third of the egg yolk mixture and beat until well incorporated. Add the remaining egg yolk mixture and beat until smooth
- Sprinkle the powdered gelatin on the water, and microwave until the gelatin is melted, about 20 – 30 seconds. Make sure there are not any gelatin clumps
- Add a little bit of the mascarpone to the melted gelatin and stir until smooth. Add this mixture to the remaining mascarpone and beat until well incorporated
- With a spatula, fold a third of the whipped cream into the mascarpone. Then fold in the remaining whipped cream. Be gentle so that you don't squash out too much air from the whipped cream
Assemble the Charlotte
- Generously brush the bottom layer of sponge with 1/3 of the coffee syrup. It should be a dark brown color and saturated with the syrup

- Place 1/3 of the mousse (about 320g) on top of the first layer of sponge
- Place the second sponge on top of the mousse. The side that was touching the parchment paper should be facing up. Brush with 1/3 of the coffee syrup.
- Place 1/3 of the mousse on top of the second layer of sponge
- Place the third and final sponge on top of the mousse. Brush with the remaining syrup
- Place the remainder of the mousse on top of the third sponge and smooth with a spatula. The tops of the ladyfingers should peak over the edge of the mousse
- Place in the fridge to set for at least 1 hour. Remove the ring once the cake is set. If you leave the ring on for too long, it will form condensation on the sides of the cake.
Serve
- Before serving, dust with cocoa powder. For clean edges, cut out an 18cm circle out of a sheet of parchment paper. Lay the parchment paper on the edges of the cake, and dust in the cut-out area for a circle with neat edges.
Notes
- I strongly recommend baking in grams, but have included imperial measurements for convenience. Please note that all recipe testing is done by weight.
- For egg measurements, I have included the grams for precision. However, I understand weighing eggs can be a hassle so I have included an approximation using medium eggs. The recipe is tested using the number of medium eggs provided.
- For gelatin, I use Knox powdered gelatin which has a 225 bloom
- Making ahead – this cake is great for making ahead, and will last up to 3 days in the fridge after assembling.
- Servings – I find this cake feeds 15 – 20 people