
I recently went on a 2 night backpacking trip in Denali National Park in units 26 & 27. This guide is based on my personal experience and what I wish I knew going into the trip.
This page may contain affiliate links. This means I may get a small commission if you purchase through these links, at no additional cost to you.
Last weekend, I spent 2 nights backpacking Denali National Park. It was the most intense backpacking trip I’ve been on, and I struggled to find first hand accounts of people’s experience and trip planning. I’m by no means a Denali expert, but wanted to share my experience in case it’s helpful for someone else’s planning.
- What our trip to Denali looked like
- How much experience do you need to backpack Denali National Park?
- How to get a Denali backpacking permit
- How to prepare for your backpacking trip to Denali
- Understand the Denali terrain & weather
- Prepare your gear
- Prepare your food
- Do you need a bear canister?
- What’s the best way to deal with mosquitos in Denali?
- Do you need a satellite communicator?
- How to get to Denali
What our trip to Denali looked like
Our trip took place the first week of July 2023, and we were a group of 2, where both of us had backpacking experience. We did not make any campground reservations as we were planning to get backcountry permits for different units in the park.
Bright & early on Saturday, we drove to Denali from Anchorage. This took about 4-5 hours including stops for food. We got to the ranger station around 11am, picked out our backpacking units, got a bear canister, and watched the mandatory prep videos and safety talk. We had limited choice of units – because it was July 4 weekend, a number of units were already full, and units deeper in the park were not accessible by bus due to a landslide. We ended up choosing units 26 & 27, because they would have few river crossings and fewer bears. This whole process took about 2 hours.
We had called the park earlier that week to book tickets on the camper bus, so did not need to buy tickets at the park. We caught the 1:30pm camper bus into the park and got dropped off at the Savage River Camp bus stop.
Our route in Denali
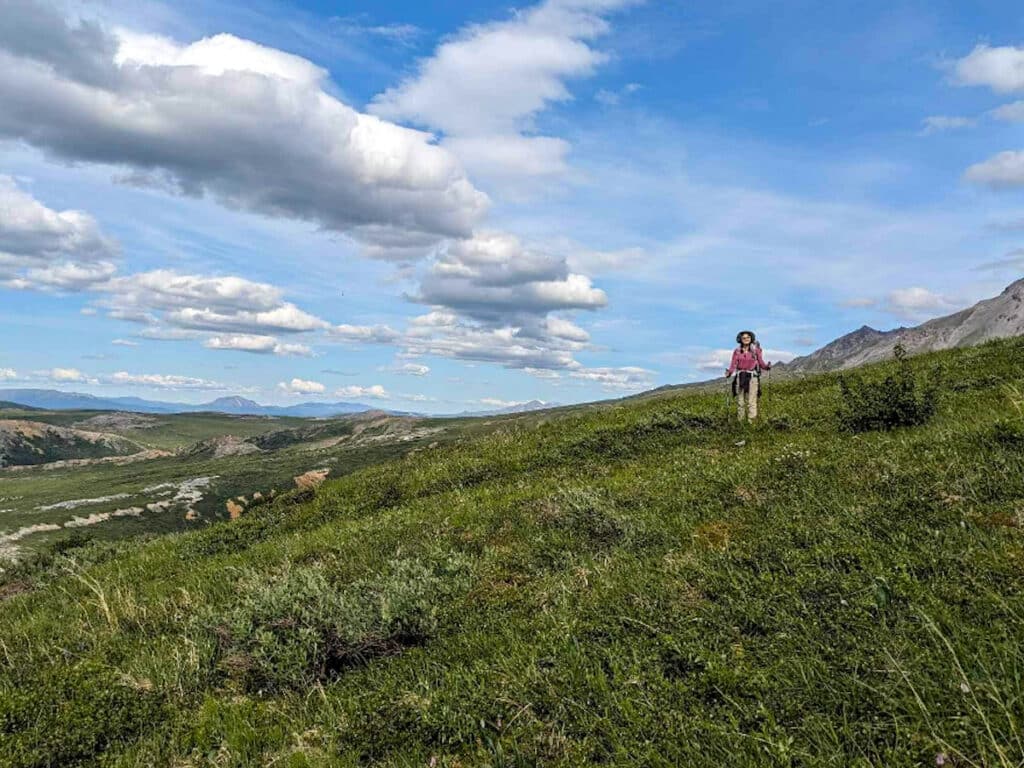
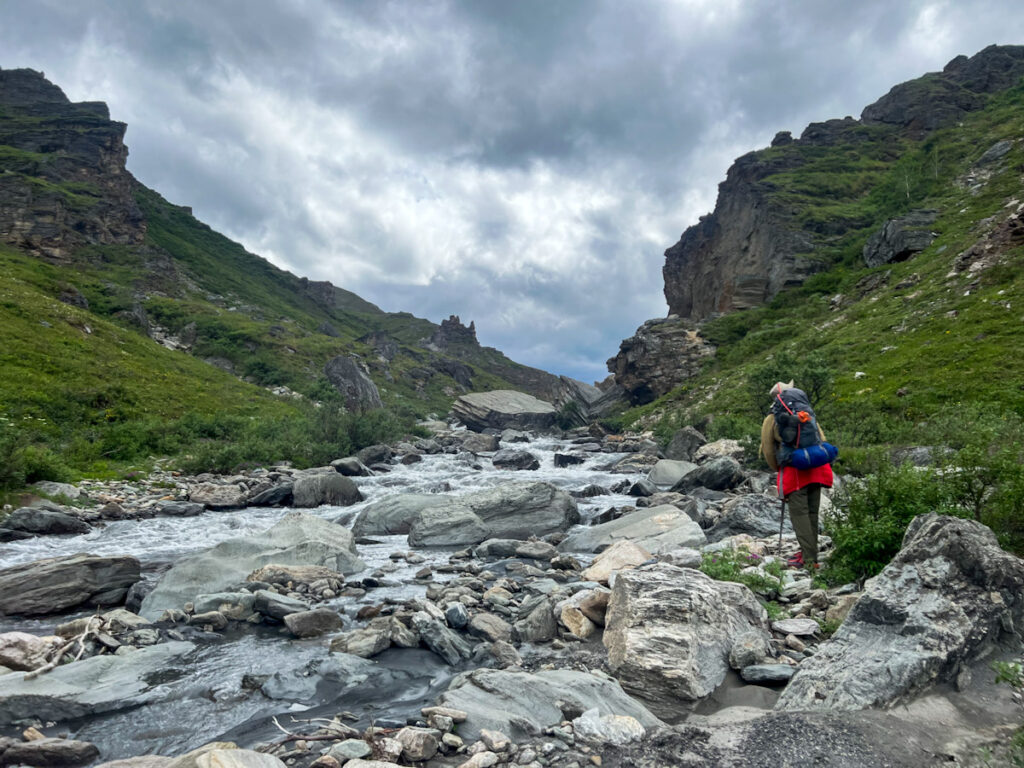
Because there are no trails, you fully determine your route inside the park. We started by hiking the Savage River Loop into unit 26, hiking beyond the end of trail to follow the Savage River. The plan was to hike along the river until we reached a flatter area where we could start hiking up Primrose Ridge into unit 27. We would spend one night in unit 26, then spend two nights in unit 27 before hiking onto the road and catching the camper bus back to the bus depot.
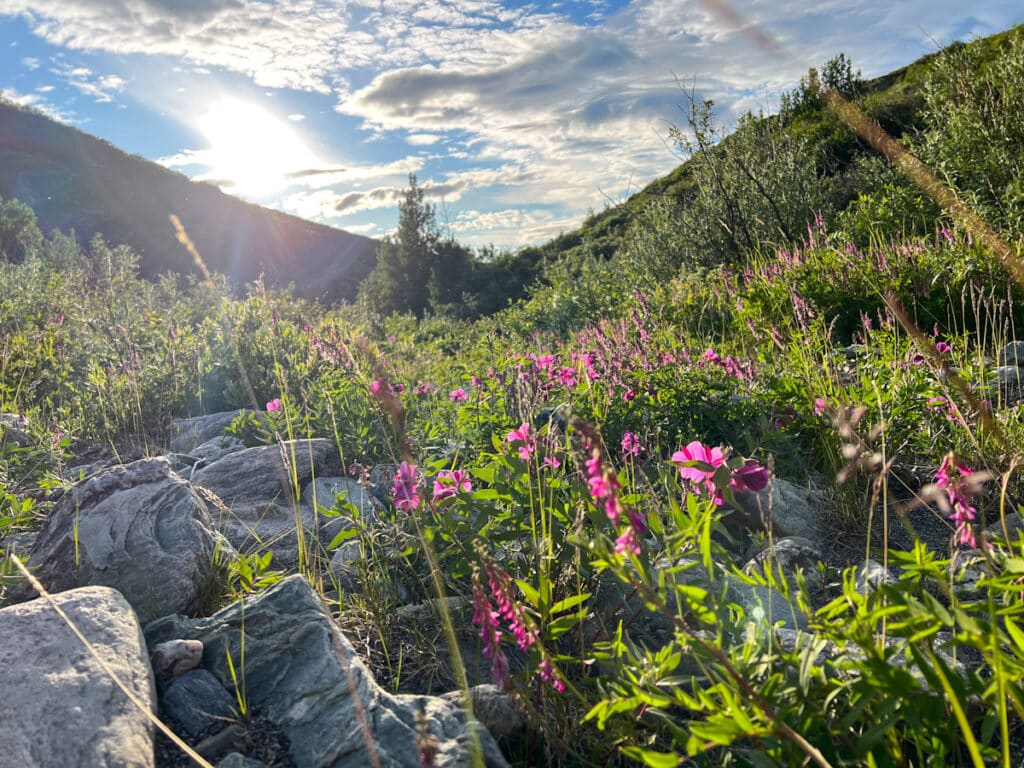
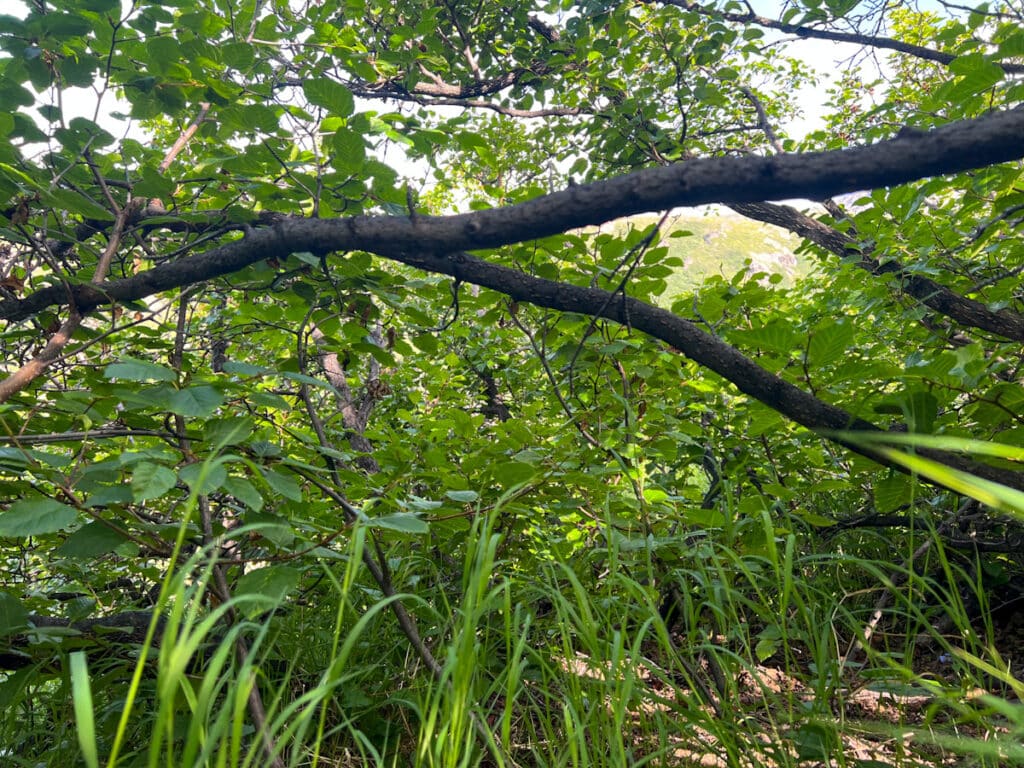
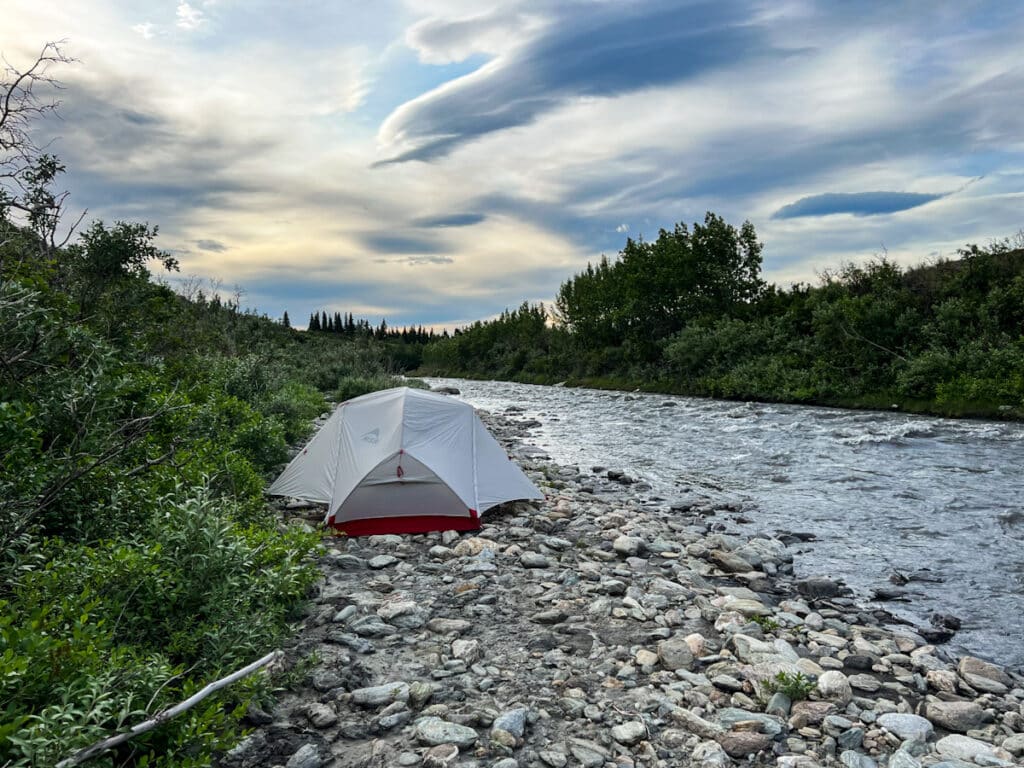
Alas, things did not go as planned. Walking along Savage River was extremely difficult – both sides of the river are covered in brush and small trees so there was lots of bushwhacking involved. We ended up making camp earlier than expected due to the slow progress.
On the second day, we decided to ascend Primrose Ridge from our campground rather than hiking to an area with flatter terrain. This was a bad idea. I think we might have picked the most difficult route up to the ridge – it was extremely steep and covered in brush and small trees that obstructed our path. At times we were using the tree branches to pull ourselves up, and it was very slow and painful progress. In about 6 hours of hiking, we went 2 miles – and it was the most painful 2 miles of my life! By the time we were near the peak, I was exhausted and we were running out of water. It was also extremely windy near the peak, and I was honestly petrified of slipping and falling, to point where I could not move. A great time for my fear of heights to kick in!
We made the difficult decision to turn back and camp near the river. At that point, neither of us felt confident that we could reach the peak and find water. Our way back was much easier – at this point, we understood how to choose a path that took us through easier terrain. We also realized that wading along the river would actually be significantly easier than bushwhacking along the bank, wet socks and all.
On our 3rd day, we decided to cut our trip short and head out of the park. At this point, it wouldn’t be possible for us to go through unit 27 and make it out of the park within the single night remaining on our backcountry permit. We spent another 5 hours trekking out of the park and back to the road.
Reflecting back on our Denali trip, between the terrain and steepness, we may have gone the absolutely dumbest route that we could have.
We decided to ride the camper bus to the end of the line and back so we could see more of the park, which I really enjoyed!

What I wished we did differently
We had a pretty difficult trip, and there are a number of things I wished we did differently.
- Worry less about bears and river crossings when choosing our units – There were so many warnings about grizzlies and dangerous river crossings that we indexed heavily on selecting units where we’d be less likely to encounter these challenges. As a result, we ended up with a mountainous area with lots of difficult bushwhacking. There were definitely moments where I would have taken a grizzly sighting in exchange for some flat terrain and low shrubbery.
- Actually understand how to read a topographical map – From a navigation perspective, we were comfortable reading a topographic map. However what we were quite bad at was understanding how steep terrain would actually be based on the map. As a result, we ended up navigating into terrain that was too steep for our comfort.
- Understand how much slower you go without a trail – I will never take a trail for granted again. Between the bushwhacking and shoving branches out of your face and wading rivers, you go much, much slower in trail-less terrain. It is mentally more exhausting as well, because you’re constantly thinking about where to go next, and how to get there in the least painful way. Sometimes you have limited visibility (i.e., 10 feet in front of you) and have to make some difficult judgement calls.
- Be more comfortable walking in the river – River crossings can be extremely dangerous, so I was nervous about walking in the Savage River. This led to a lot of bushwhacking and zigzagging along the bank. Once we decided to walk in the river, our progress was much faster and easier. Of course we still used an abundance of caution – even right along the bank, the water could reach up to our knees and at times the current is quite powerful.
What I would do again
Despite the difficulties, there were some things we did that I would definitely do again.
- Bring a satellite communicator – Satellite communicators are expensive, but in this case it was worth it. We were able to use our Zoleo to send check in messages every night to our families. And when I was feeling stuck and scared on the peak, it really helped my peace of mind knowing that I had the ability to send an SOS if needed.
- Go with at least one other person – I’ve done solo hiking and traveling before, but I was extremely grateful to have a partner on this trip.
- Have previous backcountry backpacking experience – Our prior backpacking experience helped us understand how to manage our water supply, what were good locations for camping, and general best practices around safety and risk.
- Bring trekking poles – This was my first hike with trekking poles and they were working overtime, from getting me up and down steep terrain to testing out water depth in the river. I don’t think I could have done the trip without trekking poles.
Okay so that was our experience – keep reading for a general guide for preparing for the trip!
How much experience do you need to backpack Denali National Park?
Denali is definitely a step up from your average backpacking trip – there are very few trails in the park, and it’s extremely remote. We had both been backcountry backpacking a few times before this trip, and personally I’m glad that we had that experience going into Denali. Here’s what you should be comfortable with heading into the trip:
- Fit enough to navigate through steep and uneven terrain
- Comfortable reading topographic maps and matching up visual landmarks to the map
- Comfortable navigating with a compass
- Comfortable dealing with wildlife encounters, such as grizzly bears and moose
- Comfortable crossing rivers
- Understand camping and hiking basics, such as managing water supply and where to set up camp
How to get a Denali backpacking permit
Denali backpacking permits are first come first serve and can only be reserved in person at the ranger station. Units can only be reserved up to 24 hours before the start of your backpacking trip. The ranger station opens at 9am, so try and get there early to get the unit of your choice!
Select your Denali backpacking units
Denali is divided into 87 backcountry units. For each night of your backpacking trip, you’ll need to decide which unit to camp in and get a permit for that night. Day hiking in a unit does not require a permit. About 4 – 12 permits are allowed each night per unit, so if you’re going with a bigger group you’ll need to find a unit that has enough permits!
Each unit is unique with different features. Before you get to Denali, it’s important to research the units and come up with a shortlist of units that you’d be excited to camp in. Here are some factors to consider when choosing your units:
- How comfortable are you with river crossings?
- Are you excited about wildlife encounters (e.g., bears, moose, sheep) or would you rather avoid them?
- Do you prefer flat or mountainous terrain?
- What kind of landscapes do you hope to see on your trip?
- Is the unit accessible by bus, or do you need to hike into it?
I recommend going through Denali’s unit guide and carefully reading through each unit, along with any special features or warnings that the park might have called out.
These units were on our shortlist:
- units 4 – 8 – they seemed pretty flat with a variety of landscapes
- units 25 – 27 – there would not be as many river crossings, and fewer berars
At the time we were planning our trip, units deeper into the park such as 12, 13, and 14 were not accessible by bus due to a landslide.
Buy your Denali camper bus tickets
If you’re going more than 15 miles into the park, you’ll need to book a ride on the camper bus. We were able to call in ahead of time and reserve tickets on the 1:30pm bus. It turns out we really didn’t need them because we ended up getting dropped off at the Savage River stop, which is serviced by the free courtesy shuttle. Our bus tickets were $35 per person.
Once you have a camper bus ticket, you can hop on and off the bus at any point within the park, as long as you don’t return to the bus depot. We ended up catching the bus and riding it as far into the park as we could go just to see different landscapes.
Make sure you take a picture of the bus schedule, so that you know approximately when you need to be at the road for pickup. There is a chance that the bus is full, in which case you’ll have to wait for the next one.
How to prepare for your backpacking trip to Denali
It’s time to prepare your gear and make sure you have everything you need for a fun and safe trip in Denali!
Understand the Denali terrain & weather
Backcountry backpacking in Denali will likely involve going off trail. This means you’ll need to be prepared for bushwhacking, uneven terrain, and river crossings.
Weather in Denali can also vary, with a wide range of temperature and weather conditions.
You’ll want to pack the right gear to support the areas of Denali that you’ll be spending time in.
Prepare your gear
This was our packing list. I’ve marked items that I would not bring again or did not use, and included links for items where I could find them online.
Clothes
- 1 long sleeved shirt (Icebreaker Sphere II women’s shirt) – I wish I got one that specifically had bug protection as well
- 1 long hiking pant (REI convertible hiking pant) – I love these pants, but they did not protect from mosquito bites
- 1 short sleeved shirt – I brought this in case I got soaked and needed a change of clothes, but did not end up using. I probably could have left it at home.
- 1 thermal shirt (Uniqlo heat tech) – I didn’t use this because it was very warm
- 1 thermal legging (Uniqlo heat tech) – I didn’t use this because it was very warm
- 2 hiking underwear (Ex officio Women’s brief) – I love these underwear. They dry super quickly and are very breathable
- 3 pairs wool socks (Smartwool crew socks) – These are my go-to hiking sock! I have pairs that are 10 years old. Your socks probably will get wet on the trip, so you want something that will dry quickly and keep you warm even when wet.
- Rain jacket (North Face Venture Jacket) – I didn’t use this because it did not rain
- Rain pants (REI zip up rain pants) – I didn’t use this because it did not rain
- Down vest (Uniqlo down vest) – I didn’t use this because it was very warm
- Hat (REI Sahara Guide Hat)
Shoes
- Waterproof hiking boots with ankle support (Oboz hiking boot) – My boyfriend hiked in trail runners, which are more breathable. He was worried about the lack of ankle support but overall said it was fine. A tradeoff of waterproof boots is that they dry more slowly if they get thoroughly soaked. The last day I was hiking in wet shoes and socks the whole time!
- Lightweight waterproof hiking sandals (Tevas) – I wouldn’t recommend open toed water shoes for river crossings, since you want to protect your toes and maintain a good grip. However, these were great for walking around camp.
Camping & Cooking
- 2 person tent (MSR Hubba Hubba 2 person tent) – We love this tent! It’s easy to set up and has nice, convenient details such as side pockets
- Sleeping bag (Marmot Women’s Angel Fire)
- Sleeping pad (Nemo Tensor Ultralight Insulated Pad)
- Inflatable pillow (Trekology pillow) – I don’t love this pillow because it’s hard to pack down. But it gets the job done.
- Pot (MSR lightweight pot)
- Sporks
- Bowls
- Fuel cannister
- Stove (MSR Pocket Rocket)
- Swiss army knife
First Aid
- Advil
- Allegra (my allergies were TERRIBLE the entire time, even with Allegra)
- antibiotics
- allergy eye drops
- mole skin
- duct tape
- sunblock
- band aids
- alcohol wipes
- hand sanitizer
- hydrocortisone cream
- Neosporin
- chapstick
- toothbrush & toothpaste
Water
- 1 Liter water bottle (Nalgene)
- Water filtration system
- Iodine tablets (backup)
Bear Safety
- Bear canister – our bear canister was too small, so we rented one for free from the ranger station
- Bear bells – these were useless and I would not bring next time
- Bear spray & holster – you can rent these from the ranger station
Mosquito prevention
People are not lying when they say the mosquitos are insane!
- 100% deet bug spray
- head nets (Sea to Summit head nets) – I was very happy to have the head nets because the mosquitos were absolutely swarming
Miscellaneous
- Trekking poles (REI trailmade trekking poles) – These are a must!!!
- Satellite communicator (Zoleo)
- Micro fiber towel
- Carabiner
- Diaper pins – great for pinning your wet socks to the back of your pack
- Whistle
- 4 small ziptop bags
- 3 large trash bags – these were helpful for lining our bags, in case we fell into the water
- small stuff sack
- poop shovel
- toilet paper
- marine cord – we tied these to our bag and wrapped them around our wrists, in case we fell into the water and needed to wiggle out of our packs
- external battery pack and chargers
Prepare your food
Denali is deep in bear country and all of your food and items with scent need to fit in a bear canister. For lunch and dinner, we packed dehydrated meals. These are pricier, but honestly delicious. Some of our favorites are the pad thai from Backpacker’s Pantry and shakshuka from Alpine Aire. For breakfast, we packed a mix of nuts, dried fruit, granola, and powdered milk that we mixed with water for a tasty cereal.
Do you need a bear canister?
Yes. Denali is deep in bear country and all food and scented items must go in a bear canister at night. You can rent these for free from the ranger station.
What’s the best way to deal with mosquitos in Denali?
The mosquitos are insane and I got bitten up pretty badly. I wore a long-sleeve shirt, but not a mosquito-proof shirt. Lesson learned.
To deal with the mosquitos, I recommend long-sleeved shirt and pants that are specifically bug-proof. I also recommend head nets and covering exposed skin with 100% deet spray. If you do get bitten, bring hydrocortisone to deal with the itching and swelling.
Do you need a satellite communicator?
Whether or not you invest in a satellite communicator is up to your own level of comfort and risk. We purchased a Zoleo for the trip, and we’re very happy that we did. It gave both us and our families peace of mind.
Note that on top of the cost for the device, you need to pay a recurring monthly subscription in order to send messages. For the Zoleo, this was $20 per month with a minimum 3 month subscription. There was also a $20 activation fee for a total of $80 added on to the initial $200 price for the device. Peace of mind does not come cheap!
How to get to Denali
We rented a car and drove from Anchorage to Denali along the highway. You could also take the Alaska Railroad, which I’ve heard is absolutely breathtaking!
Fun stops on the way to Denali
- Talkeetna – a cute little town about 2 hours away from Denali. We enjoyed stopping for lunch.
- Hatcher’s pass – this is only open during certain seasons. It was recommended to us, but we ended up not going through the pass.