
We’ve all heard that the key to baking great artisan bread is a Dutch Oven. Don’t get me wrong – I have a Dutch Oven, and I love it. It helps me turn out beautifully puffy and crusty loaves of bread every single time.
But alas, there are limitations to a Dutch Oven. And I’m here to tell you that you do not need a Dutch Oven to make a bangin’ loaf of sourdough (or really any crusty) bread.
First, they are pretty freaking expensive, even if you get a “low-end” model. If you decide to go high-end, a 7 qt Le Creuset can set you back $400. (Do any of you have a Le Creuset? Can you please tell me if it’s worth selling my left kidney in order to purchase one?)
Second, they can really only bake 1, maybe 2 (small) loaves at a time. I’ve spent nearly 3 hours baking 4 loaves of sourdough because I couldn’t get them all to fit in my trusty Dutch Oven. (They did come out beautifully)
Finally, Dutch Ovens are really not portable. They are incredibly heavy and if you packed one in your carry-on, TSA would think you’re trying to smuggle a cast iron bomb on board your flight. Inevitably, you will go in vacation, want to bake a loaf of bread, and be without a Dutch Oven.
A recent, Dutch Oven-less trip (I had the foresight to pack my sourdough starter) let me reconsider the question: how can I bake beautiful, crusty, artisan bread WITHOUT a Dutch Oven?
And this wasn’t the first time I’d asked the question. Earlier on in my baking career, I was far too cheap to invest in a Dutch Oven and spent 3 hours Googling “how to bake crusty bread with only a cookie sheet). I didn’t find the answer.
But now I have it. And I am here to share it so everyone can bake beautiful, delicious, crusty, artisan, perfectly puffed bread without a Dutch Oven.
Let’s level set – why is a Dutch Oven so great anyways?
Dutch Ovens are fabulously wonderful for baking bread because they are 1) really great at trapping steam and 2) provide an extra toasty warm environment for the bread. A lot of fancy professional ovens inject steam to create the perfect bread baking environment, so in a sense you can think of Dutch Ovens as a steam injection hack.
As a bread baker, you want your loaf to achieve two things:
- Great oven spring for a light, airy loaf
- A crackling, crisp crust
The warm temperature from the Dutch Oven can help with oven spring, and the steam is key for both oven spring and crust formation.
Oven spring
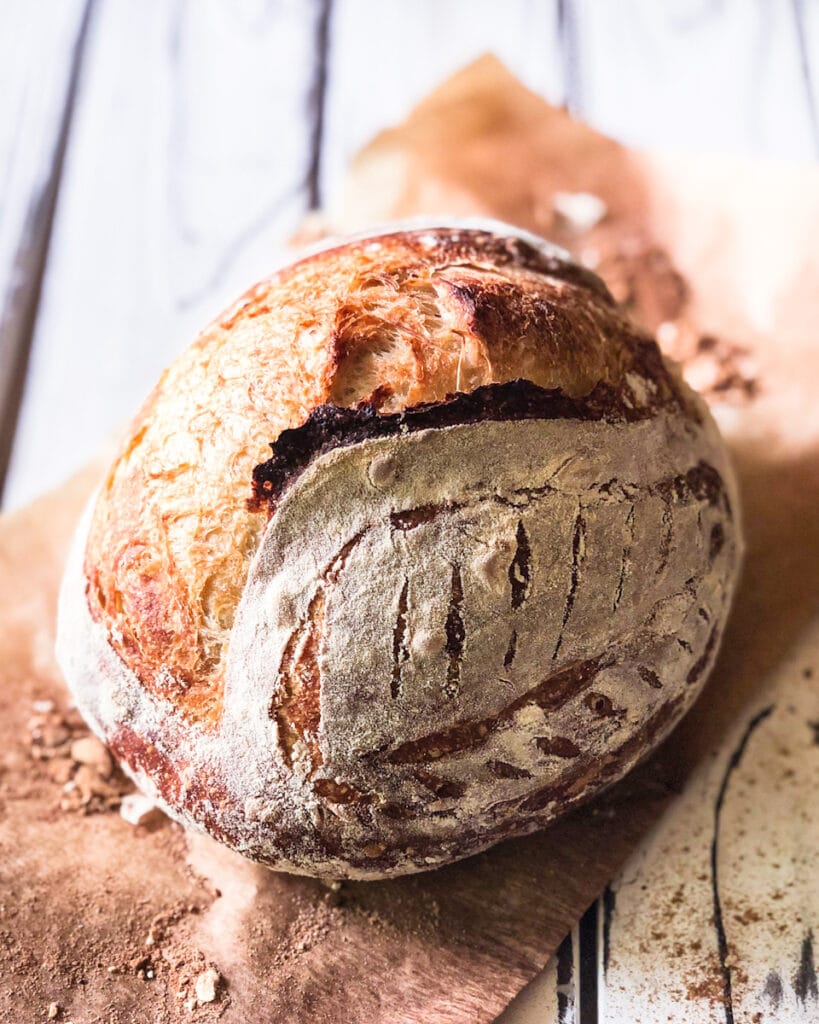
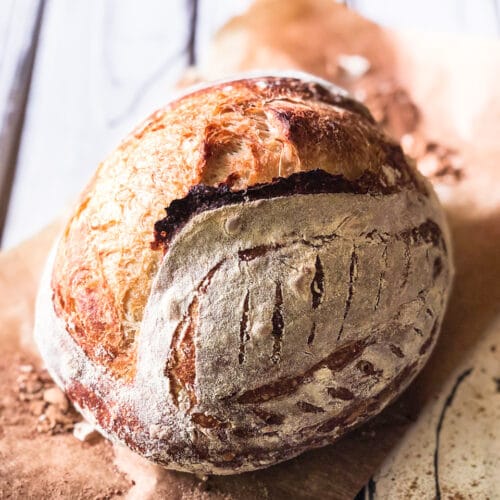
Oven spring is the term for the first 10 or so minutes your loaf is in the oven where your loaf rapidly grows and expands. This is because the warm temperatures encourages yeast to produce a last burst of activity (before dying and being entombed in your loaf) and causes gas bubbles to expand. Adequate oven spring helps your loaf become puffy and airy. If you’re a sourdough baker, this helps you get that coveted “ear” on your loaf.
Steam is integral for oven spring because it keeps your crust moist and hydrated. A moist crust is a soft crust that is able to expand with your loaf. Without steam, the crust hardens too quickly and limits your oven spring, causing the loaf to burst in weird places.
A warm, pre-heated Dutch Oven helps with oven spring by further encouraging yeast activity and gas expansion early on in the bake.
Crust
As the surface of the dough heats, starches at the surface begin to absorb moisture and gelatinize (wowza!). This starch gel is what becomes the crust. The more moisture / steam you have, the more gel is formed, leading to a crisper crust.
Steam also keeps the surface of the loaf at a cooler temperature, which delays the Maillard reaction. The Maillard reaction is chemical magic where sugars and amino acids in the loaf react with each other and cause browning (another famous Maillard reaction example is caramelization). Delaying the Maillard reaction keeps the loaf from browning too quickly.
My experiments
I did a series of experiments to try and imitate the temperature and steam capabilities of a Dutch Oven.
Experiment 1: boiling water in a tray at the bottom of the oven
The idea: create more steam with boiling water (not rocket science)
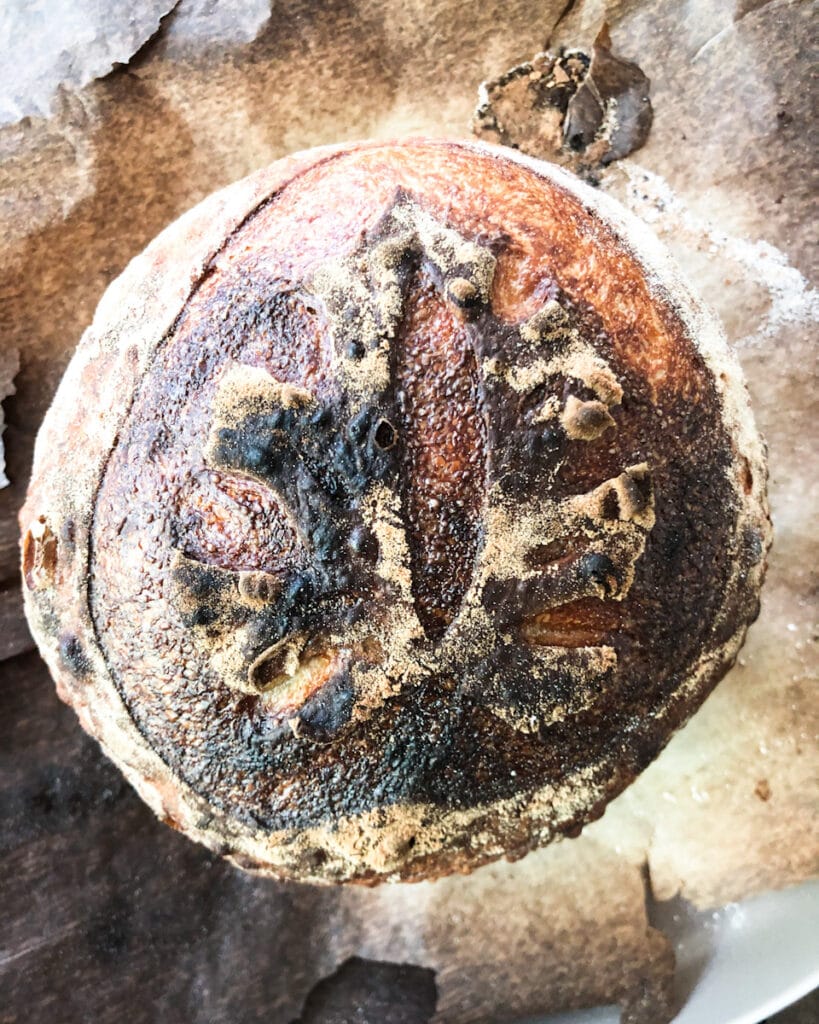
The outcome: A pretty crisp crust but subpar oven spring. I saw that the crust had burst at the bottom of the loaf, indicating that the crust had set too quickly. As you can see from the pictures, the crumb is dense.
Experiment 2: Pre-heated the baking sheet, plus boiling water in a tray PLUS ice cubes
The idea: Create extra heat to encourage oven spring by pre-heating the baking sheet, along with even more steam from ice cubes!!
The outcome: Pretty similar to loaf #1, where the crust had burst. I realized I needed a cover over my loaf both to protect it from the heat of the oven and to trap all that lovely steam.
Experiment 3: Pre-heated the baking sheet, placed ice cubes near the loaf, and covered everything with a giant aluminum baking dish
The idea: Mimic a Dutch Oven cover using a disposable aluminum baking dish. Place ice cubes inside the dish to create extra steam without needing a tray of water.
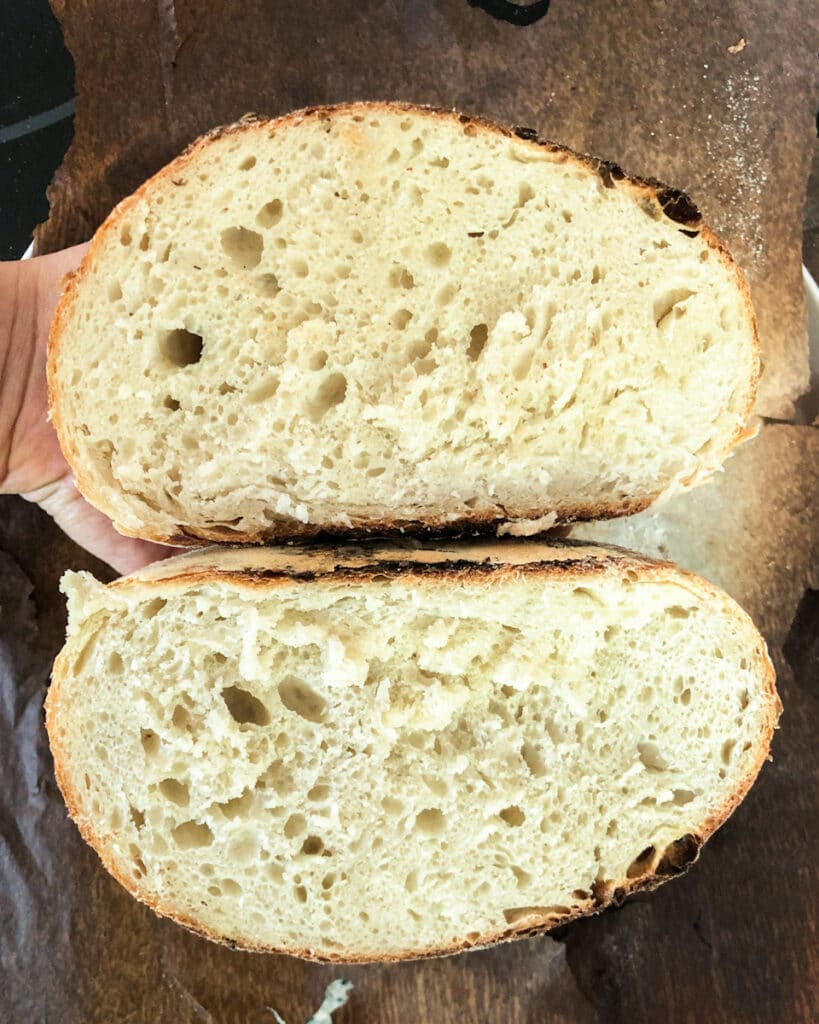
The outcome: Bingo! This loaf had a beautiful oven spring and didn’t split at the bottom. The crust was the perfect golden brown.
Was it actually the same as a Dutch Oven?
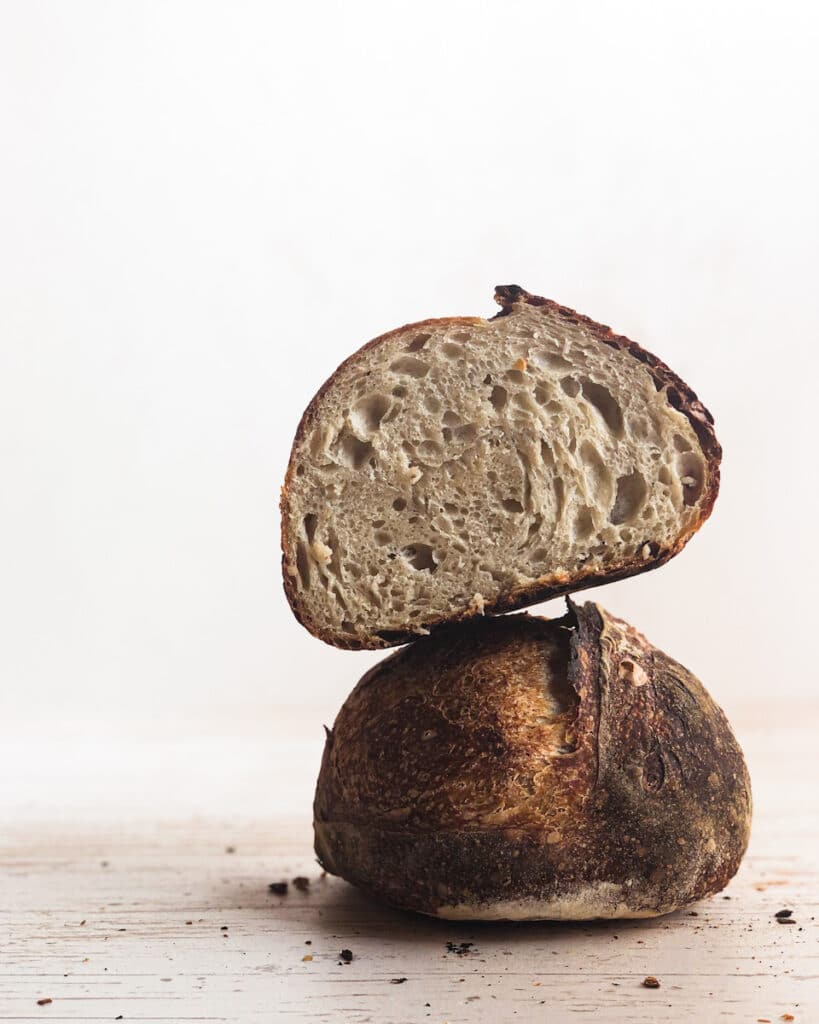
In the pictures below, you can compare a loaf baked in my Dutch Oven with a loaf baked using the aluminum baking tray method. In the end, I think the Dutch Oven gave a more open, airy crumb, but the results are quite similar. Inevitably, the baking tray is not as airtight as the Dutch Oven, which leads to some steam escaping.

When you look at the outside of the loaves, the result is pretty comparable. The loaf baked in a Dutch oven is slightly rounder with more blisters.

When you look at the inside of the loaves, you can see the loaf baked with a Dutch Oven had a slightly better oven spring, resulting in a rounder loaf with bigger air bubbles.
That being said, I would use the aluminum tray method again if I had to bake multiple loaves at once.
Do you bake bread with a Dutch Oven? If you try this method, let me know in the comments below! Or you can tag me on Instagram with @halicopteraway or #halicopterway.
Recipes to try this method with:
Resources:
http://www.thefreshloaf.com/node/4686/what-exactly-does-steam-oven-do-bread
Want to save this recipe?
How to make sourdough without a Dutch Oven
Ingredients
- 1 disposable alumnium baking tray
- 1 baking sheet
- parchment paper
- 3 ice cubes
Instructions
- Place the baking tray in the oven and preheat to the temperature in the recipe you are following.
- Place your shaped loaf on a sheet of parchment paper. Score the surface.
- Once the oven is preheated, remove the tray from the oven and quickly transfer the loaf onto the tray. Place the ice cubes under the sides of the parchment paper. Cover with the aluminum baking tray, making sure that the ice cubes are under the parchment paper.
- Place in the oven and bake. 10 – 20 minutes before the end of the bake (the time will vary depending on the recipe you are following), remove the aluminum baking tray and let the loaf finish baking uncovered.
So happy to run across this! Was struggling on how to bake two loaves of sourdough at once as I always use my dutch oven! This worked great!
this is awesome!! trying today as my Dutch oven is very small and my banetonne shaped loaf doesn’t fit
following in IG now for more great tips!!
Thank you for this idea! I am a bit confused, as the experiment description and the recipe state different things. Does the loaf go in the disposable foil pan, and a cookie sheet to cover? Or are you using a cookie sheet with sides for the bottom, and covering with the disposable pan? Thank you so much for clarifying. =)
Hi! The loaf goes on a cookie sheet and then covered with a disposable pan
Thank you so much for your prompt response! I will try to remember to update when I have time to bake. I asked the woman who sold me the sourdough starter, and she said it sounds like a great idea! 🙂
Thank you so much for your time and effort in investigating this! I was looking for this exact information. I tried the water bath method before also. Great for cheesecake not so good for bread, lol.
Thank you for this, I’m baking on a boat and the expense and size of a dutch oven isn’t an option for me! Do you have to have the dough covered?
Hi Mardi, you don’t have to cover the dough, but it does help a lot with the rise. If you’re able to get a large aluminum roasting pan that works well
Does the disposable foil pan toch the dough? Or do you need an extra deep pan so that it doesn’t touch?
Hi Candice, I like using a deep pan that’s at least 4-5 inches deep so it doesn’t touch the top of the loaf
I plan to use clay tiles and parchment paper, then add the aluminum roasting pan on top. But was wondering if I could place the roasting pan on an angle with one side off the tiles so I could use a cast iron pan with hot water and the steam would rise into the pan instead of using ice cubes?
This is an AMAZING recipe. Thank you so much!
I’m trying to follow this: parchment paper on cookie sheet & ice cubes beneath the parchment paper and the sourdough on top of the parchment & then the aluminum tray covers dough & everything?
What is a train? (In your description)
Hi Liza, sorry there was a typo in the description! I’ve updated the post to clarify. Your interpretation is correct – parchment paper goes on baking tray, sourdough on top of parchment paper. Ice goes under the parchment paper immediately before baking and then the tray covers everything, including the dough and ice cubes, to trap the steam. I put the ice under the parchment paper so that there is a bit of a barrier between it and the loaf.
Hi
I wonder of you can help me please? I’m very new to this whole sourdough thing and find it very daunting. I love your idea of baking without a Dutch oven and plan to do this. However you say you use a 5 inch deep roasting tray, where can I get one on these? I’ve looked everywhere.
Many Thanks 😊
Hi Marie, I think a 3-4 inch pan could work as well. You just want it to be taller than your final loaf of bread
Hi again
I have a 4 inch cast iron casserole pan, would this be ok?
Thank you 😊
Hi Marie, I think that would work. Good luck!
This recipes sounds great. I am sorry if I am repeating a question already asked – but wondered if you think a regular roasting pan would work instead of an aluminum one?
Since I already have one – thought it might work .
Thanks ,
Krista
Hi Krista, a regular roasting pan will work as long as it’s deep enough and can handle the temperature you’re baking the bread at