

Day 0 | Day 1 | Day 2 | Day 3 | Day 4
My first attempt at baking croissants was an absolute fail, though that certainly didn’t stop me from eating the whole batch. For my second attempt, I incorporated key learnings from my first batch, and this time managed to produce a halfway decent batch. Were they perfect? No! But they did have flaky, buttery layers and actually looked like croissants.

My 3 key tips from my first croissant attempt:
- Keep everything cold and chill your dough frequently.
- Make sure the butter isn’t too cold. It needs to be the same temperature as the dough, otherwise it will break into pieces.
- Use a French rolling pin, which will give you more control.
The process:
I choose this recipe: https://sallysbakingaddiction.com/homemade-croissants/
Sally is the absolute queen of home baking. I love her recipes because she walks you through the science behind each bake and is clear about potential pitfalls of each recipe. This detail is especially helpful when making something technical like croissants.
- I halve the recipe because I want a reasonable amount of croissants. To do this, adjust the dimensions for rolling out the dough and butter.
- Like the first time, it takes about 2 days. Day 1 is for proofing the dough and laminating, and day 2 is for shaping and baking.
- The pastry rips a little during the lamination process. When this happens, I just fold that side in so the rip is covered.
- I add chocolate in some of the croissants because why not!

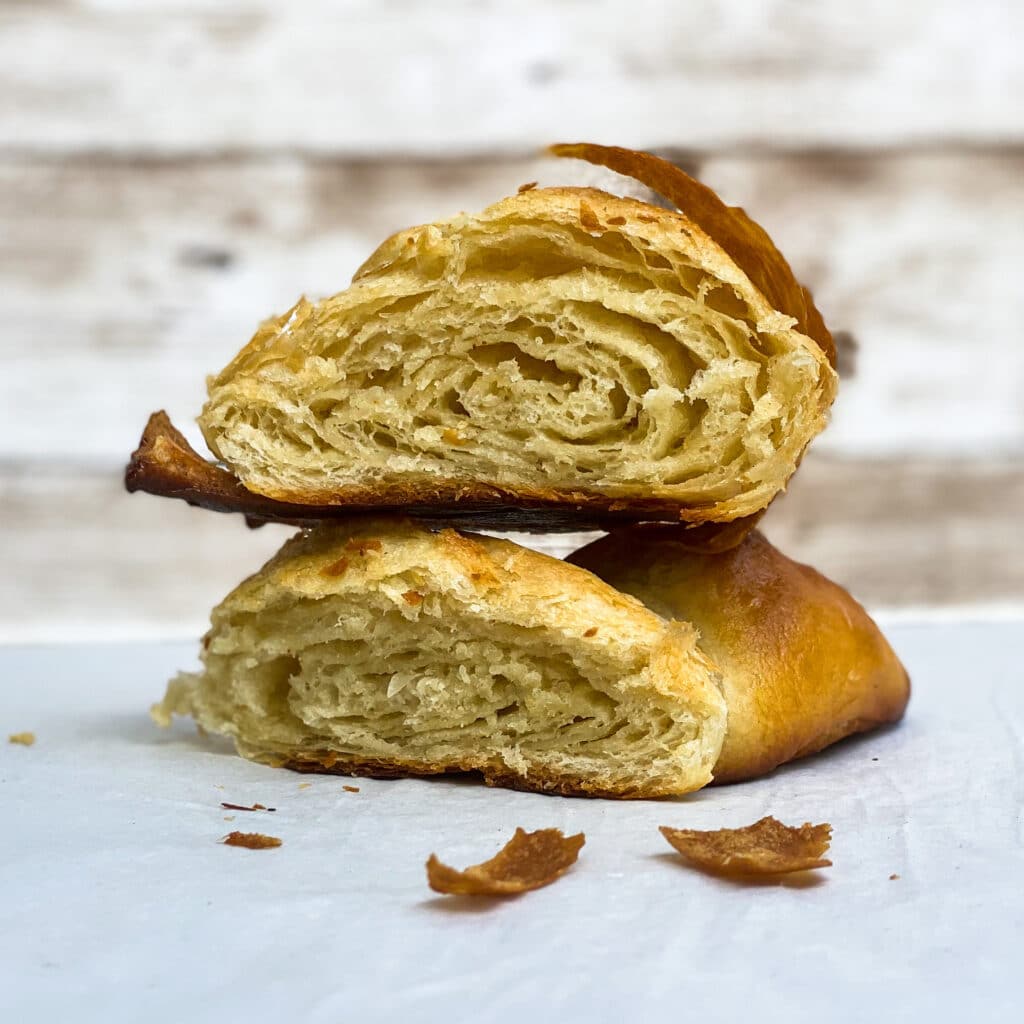
The results
Even when I was making the pastry, I could tell this attempt was going better. There were visible layers when I cut into the pastry, which is a great sign.
What went wrong:
- I didn’t distribute the butter evenly over the dough, so the edges of the dough were left with some sparse butter areas. This is called “dead” dough.
- There was still a decent amount of butter leakage during baking, though not as bad as my first attempt.
What went right:
- I actually managed to get layers, which was fantastic. The croissants were super crunchy, flaky, and delicious
- The chocolate version was delicious. Turning a croissant into a chocolate croissant is very easy – it’s simply adding chocolate in the middle.

What I learned:
- Really force the dough into a rectangle shape. I was a little lazy about making a perfect rectangle, but this impacts how even your layers turn out.
- Trim off the edges of “dead” dough. When it came time for shaping, I realized the butter distribution was a little spotty. Trimming off the edges can help get rid of the doughy places.
- Let my croissants proof for longer before baking. Underproofing can lead to butter spillage in the oven. Final proof time will vary depending on the temperature of the house, and the croissants should jiggle a little when you shake the tray.
In the end I was happy with this batch but there’s definitely still room for improvement. Which means… I should make more croissants!
I am loving these tips, Hali! I would love to make homemade croissants but I am not sure I can wait for two days before I eat them! They look like an absolutely wonderful attempt, I would have been very happy with these. And the addition of chocolate is always a great idea!