

This fluffy brioche is made using the tangzhong method to give it a beautiful, light texture that stays soft for days. This recipe uses all purpose flour for a versatile and delicious loaf of bread!
This tangzhong brioche bread combines two of my favorite breads – buttery, traditional French brioche and soft Japanese milk bread. It takes the gorgeous, golden, buttery texture of brioche and combines it with that perfect fluffiness achieved through the tangzhong method.
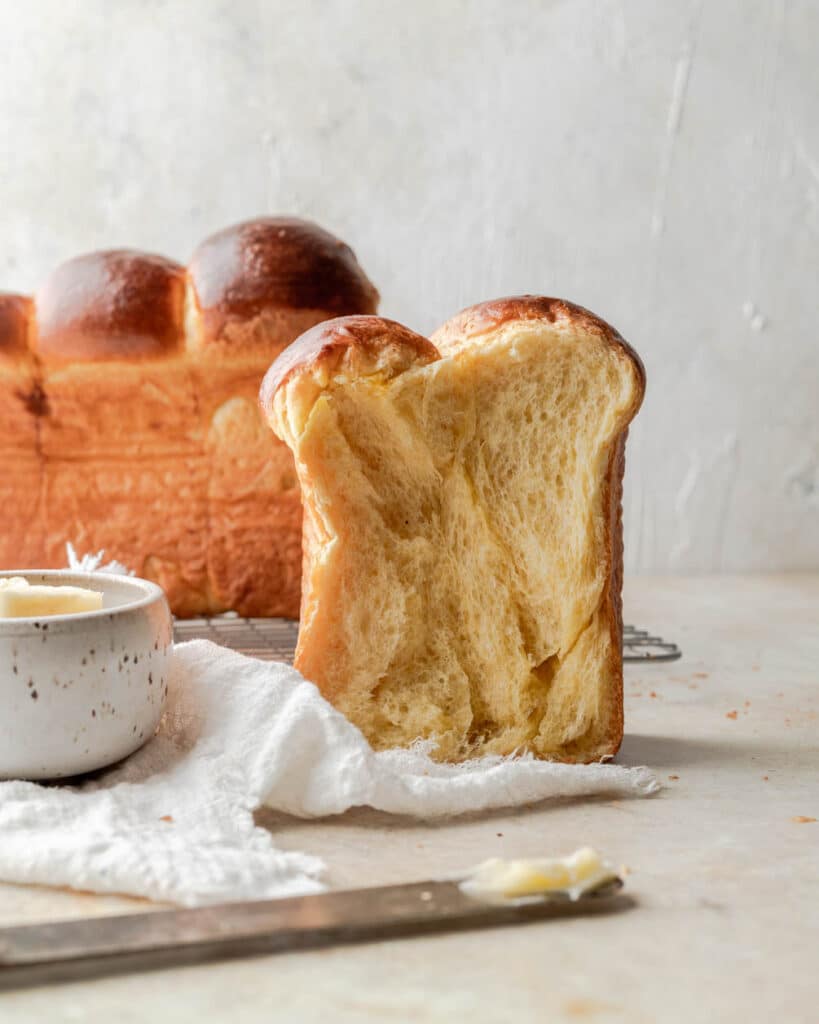
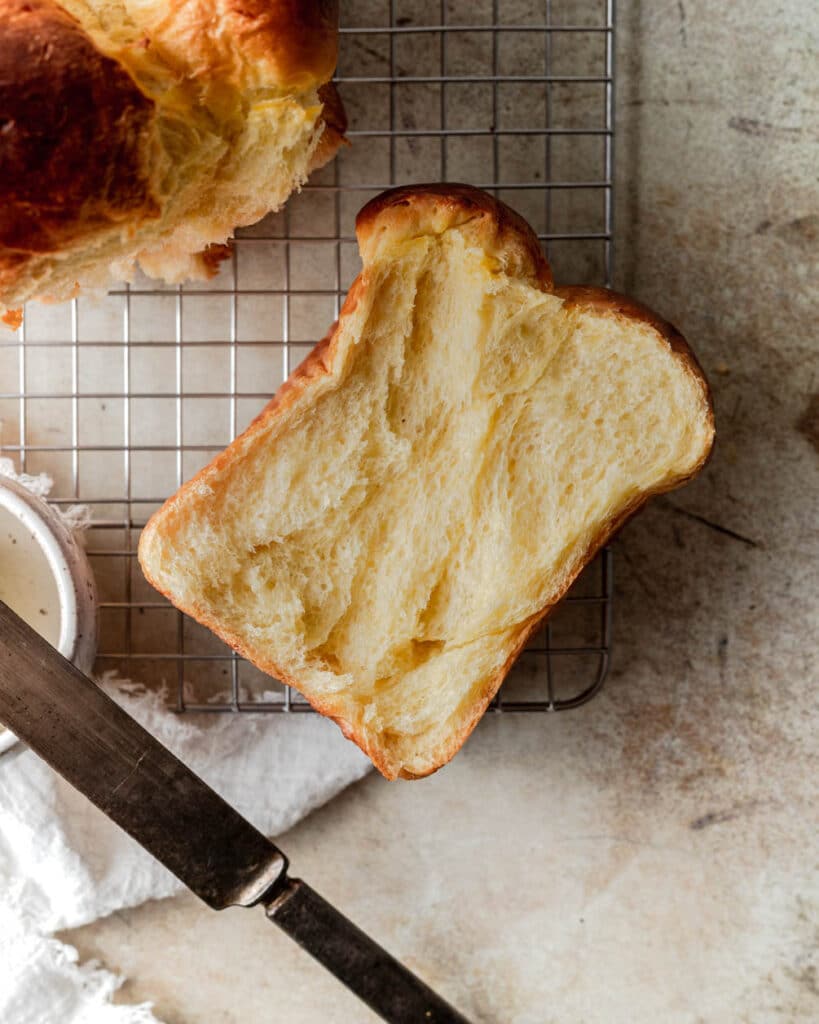
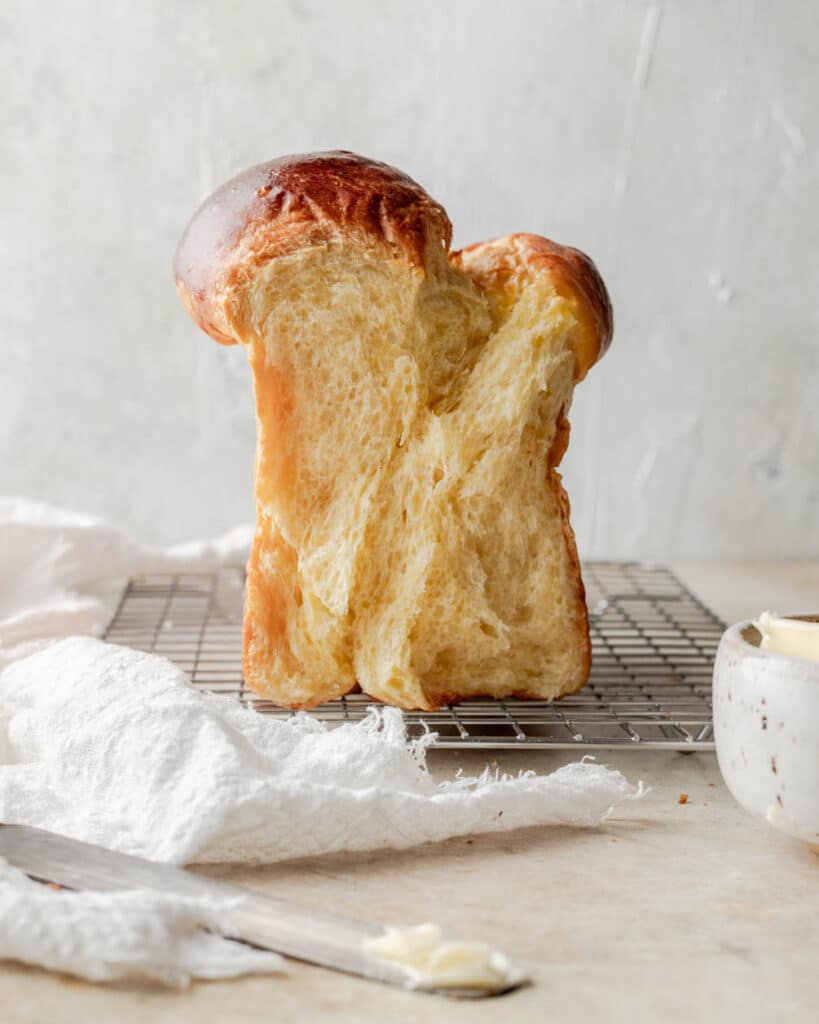
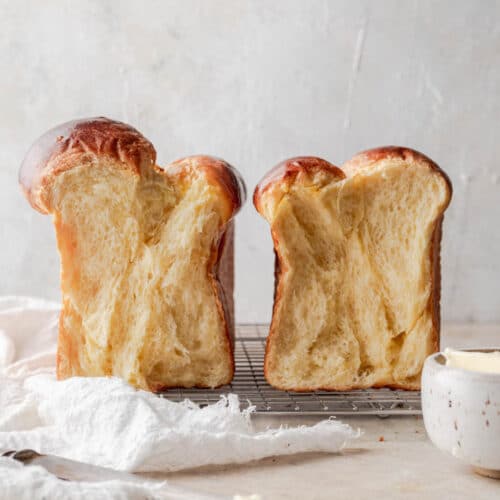
The texture of this bread is absolutely gorgeous – a cloud-like, cottony crumb that’s perfect for spreading with lemon curd or hazelnut cream. It takes some time to make, but I promise the result is worth it!
What is brioche?
Brioche is a very rich, buttery French bread that has a high fat content. It’s known for it’s beautiful golden yellow color and can be used in sweet or savory recipes.
Because it has added fats, brioche is an enriched bread. I recommend reading my guide to baking enriched breads if this is your first time baking brioche!
Do I need to use bread flour for brioche?
No! This brioche recipe uses all purpose flour. No need to use bread flour here.
Using the tangzhong method in brioche
Traditional brioche does not use the tangzhong method, but to be honest I’ve always found traditional brioche to be a little dry. All that extra butter can lead to the bread easily drying up after just a day or two. By adding tangzhong, we help create and sustain that perfect cloud-like texture.
What is tangzhong?
Tangzhong is a method often used in Chinese baking where liquid and flour are cooked together on the stove and then added to the dough. This gelatinizes the gluten strands, which helps create a softer and more delicious bread.
How do you make tangzhong?
Making tangzhong is very easy – you simply whisk together flour and milk on the stove over medium heat until it forms a thick paste. Set it aside to cool slightly before adding it to your dough!
The tangzhong will be the only liquid that is used in this recipe!
Tips for rich and buttery tangzhong brioche
Along with a super soft texture, we want our brioche to be full of delicious buttery flavor. We’ll achieve this in two ways:
- Using lots of fat in the dough with butter and egg yolks. Make sure that your butter is truly at room temperature so that it easily incorporates into the dough.
- Placing the dough in the fridge for a slow second rise. Slowing down the second rise helps the flavor develop so that you get a richer and more complex loaf. If you’re pressed for time, you can skip the second rise and go straight to shaping, but the final result won’t be as flavorful.
Tips for kneading brioche
Brioche is a very soft and supple dough, so it can be difficult to knead by hand. If you have a stand mixer, I recommend using it to spare your arms a workout. When using a stand mixer, I always use the paddle attachment instead of the dough hook attachment to avoid ripping the gluten strands. When kneading using my machine, it takes me about 15 – 20 minutes on medium-high speed.
If you’re kneading by hand, I recommend checking out my Japanese milk bread recipe for tips on how to manage very wet and sticky doughs by hand.
You want the dough to have very developed gluten to help create the final fluffy crumb. Use the window pane test to determine if you have kneaded long enough. The dough should easily be able to create a very thin and see-through sheet when you stretch it between your fingers.
Tips for baking brioche
I’ve tested this recipe with both an 8×4 inch pan and a 9 x 5 inch pan. Both work well, but you will get a slightly taller loaf using the 8×4 inch pan.
To help give the brioche a beautiful golden brown color, we will brush with egg wash twice – once right after shaping and then again right before putting the loaf in the oven.
We want to get a beautiful oven spring, so first we will bake for 10 minutes and 400°F, then reduce the temperature to 350°F and bake for another 20 minutes. The higher initial temperature encourages yeast activity to create a beautiful final rise.
How do you know when the brioche is done baking?
The brioche will be a beautiful deep golden brown and will make a hollow sound when tapped with a back of the spoon. If you have an oven thermometer, I also recommend taking the internal temperature of the bread which should be 190°F.
Brioche can seem intimidating, but the most important ingredient here is time! Just let your dough sit, and time will do most of the work for you.
Other bread recipes to try
- Sourdough Japanese milk bread
- Asian bakery coconut buns (dairy-free)
- Orange cardamom bread with almond cream
If you make this recipe, please let me know! I always love to see what my readers are baking. You can comment below or tag me on Instagram @halicopteraway.
Want to save this recipe?
Super soft tangzhong brioche
Equipment
- 8×4 inch or 9×5 inch baking tin
- stand mixer with paddle attachment
- small pan
Ingredients
Tangzhong
- 1/2 cup (120g) milk
- 3 tbsp (23g) all purpose flour
Dough
- 1 1/2 tsp instant yeast
- 3 tbsp (36g) granulated sugar
- 2 1/2 (300g) all purpose flour
- 2 eggs
- 1 egg yolk
- 1 tsp salt
- 6 tbsp (90g) unsalted butter, room temperature
Egg wash
- 1 egg white (leftover from the yolk used in the dough)
- 1 tbsp milk or water
Instructions
Make tangzhong
- In small skillet or pot, whisk together flour and milk until smooth. Bring to simmer over medium-low heat, whisking frequently, until mixture has thickened but is still pourable. It should take 5 – 10 minutes. Your whisk should leave a mark when dragged along the bottom of the pan.
- Pour into a bowl and cover surface with plastic wrap to prevent a film from forming, and allow to cool slightly until lukewarm.
Make the dough
- Add the tangzhong to your mixing bowl while still warm, but not hot to the touch. Add the sugar and yeast. Let sit for 5 – 10 minutes until bubbles form on the surface. It won't get as frothy as when you activate your yeast using warm water or milk.
- Add the flour, eggs, egg yolk, and salt to the bowl. Make sure to set aside the egg white in the fridge to use later in the egg wash. Mix using a stand mixer fitted with a paddle attachment until the dough just comes together. While the stand mixer is running, slowly add the butter into pieces until completely incorporated.
- On medium high speed, knead the dough for 15 – 20 minutes until the dough is smooth and passes the window pane test. You'll notice the dough is forming a ball in the middle of the bowl instead of sticking to the sides.
- Form into a ball and place into a lightly greased bowl. Cover and let rise for 2 hours until doubled in size. After the dough has completed it's first rise, gently punch it down and reshape into a ball. Place in the fridge and let rise for a minimum of 8 hours and up to 48 hours.
- When you're ready to bake, remove the dough from the fridge and punch down to release the air. It should have risen, but not as much as the first rise. Grease or line a baking tin with parchment paper.
- Divide the dough into 8 equal pieces and gently form into round balls. Place the balls into the tin, slightly offsetting them to form a zigzag pattern.
- Mix together your egg white and milk to make an egg wash. Brush the top of the loaf with the egg wash. Cover and set aside the remainder in the fridge to do a second brush right before baking.
- Cover the tin and let rise for another 2 hours, until the loaf has risen above the rim of the pan. When you press your finger into the loaf, it should slowly come back about halfway. If it comes back too quickly, it needs more time. If it doesn't come back at all, then you need to bake immediately.
- Towards the end of the rise, preheat your oven to 400°F. Brush the top of the loaf again with egg wash.
- Place in the middle rack of the oven and bake for 10 minutes. After 10 minutes, reduce the temperature to 350°F. if the top is browning too quickly at this point, tent with aluminum foil. Bake for another 20 minutes until the loaf is a deep golden brown and makes a hollow noise when tapped. The internal temperature should read 190°F.
- Remove from the oven and let cool in the pan for 10 minutes. Remove from the pan and let the loaf finish cooling for another 20 – 30 minutes on a wire cooling rack.
I made this and it was sensational. Pillowy, buttery, not too sweet, everything you’d want out of a brioche. I substituted 1/4 tsp of the yeast for 30g of sourdough discard because I find that it increases the longevity of baked goods.
Thanks Rita! Next time I’ll have to try using sourdough discard as well!
Thankyou Hali, this was incredible. This marks my first time EVER commenting on any recipe (and I do enjoy baking a variety of things), and first time likewise succeeding in baking an entire proper-looking LOAF. I’ve tried many recipes, but never managed to get my dough to rise above the pan..The rise in this one was incredible!!! I live in a tropical country so I let the dough rest 6hours in the fridge, and took it out on the counter to speed up the rise for about 1hr before plopping it in the oven. It’s soooo soft and pillowy!! This recipe is a KEEPER. Thankyou soooo much!!! Might try it next time with a wee bit more sugar bc I like my bread slightly sweet 🙂
hello! any suggestions for using active dry yeast?
You can sub the instant yeast directly for active dry yeast
I didn’t bake a loaf, instead I turned the dough into cinnamon rolls. They turned out amazing and the dough came together nicely! Damn best cinnamon rolls I’ve ever had.
Thanks for the recipe! I tried a few brioche recipes and so far yours is the winner! My slight tweaks are a bit more milk, egg, and sugar, topped with fleur-de-sel and baked in individual Brioche à Tête pans. Delicious!
Hi Gene, that sounds delicious! Thanks for sharing your take on the recipe
This recipe worked me out. Had to replace milk with oat milk since it’s all I had on hand, didn’t seem to make a difference in the end result. 5 stars, very easy to follow this recipe. Thanks Hali.
Thank you! I’m glad you enjoyed the recipe and thanks for sharing your experience subbing in oat milk 😊
Hi Hali, We’re at nearly 5000’ elevation and it’s always a crap shoot as to how things turn out. I followed this recipe exactly and love the “pull apart” way it came out. I refrigerated it 36 hours then baked and tented after 10”. Cooked an extra 5 minutes to a temp of 188F. We’re astounded at the moist, pillowy deliciousness of this bread!! I’ve never tried a recipe using this method! I’m sold!! Will be baking it again the end of this week for a BBQ’d Beef Brisket dinner with family!! It is worth every second it takes to make! Thank you for the details! It was so easy to follow! It’s going to be a regular menu addition from now on. My husband wants it baked a bit farther apart so he can use it for BBQ’d Pulled Pork sandwiches!!
Wish I could post a picture of mine but can’t find a way to add a photo? It turned out just like your image.
Thank you so much for this comment! I’m glad it turned out well even at high altitude, and BBQ beef brisket and pulled pork sound like the perfect accompaniment for this bread
Thank you for this recipe. And for taking the time to respond to comments!
I have had much success whenever I make rolls using tangzhong. Have been looking for a brioche recipe using tangzhong, so excited to try this; have been disappointed the couple of times I’ve made brioche using non-Tangzhong.
I like to bake brioche in a bread pan. I prefer it in a loaf and served sliced. Can you point me to instructions for how to do it correctly? My bread pan is about 4″x9″.
Thank you so much for sharing your recipe and knowledge!
Hi Sally, Thanks for your comment! I’m so sorry for the very late reply – I haven’t been getting notified properly on blog comments. In case this is still helpful for you, I would refer to steps 6 – 10 in the recipe card. When I tested this recipe, I made it in an 8″ x 4″ pan, so it should bake similarly to the pan that you have. Let me know if you have any other questions!
I tried this but separated the dough into small balls for buns rather than a loaf. It still tasted good, but at the final proof the dough expanded more outwards rather than upwards! Any idea what I could do different? I was aiming for a maritozzi ball shape and got more of a burger bun shape.
Hi Landon, I have 2 thoughts that could be helpful to get a very tall, round ball shape for rolls. First, shaping with a lot of surface tension can help create a taller shape. Second, the recipe calls for all purpose flour with no bread flour. You could try replacing some of the all purpose flour with bread flour, which can create a stronger, stiffer dough. However, you may need to adjust the amount of liquid since bread flour typically needs a higher hydration. Hope this helps!
Can I add raisins and cinnamon to this?
Hi Rochelle, yes that sound delicious!
Hi,
If I make rolls instead of bread, should I adjust the time/temp?
Hi Carmen, for rolls I would do 350F for 18-20 minutes to start.
Hi! I just made the tangzhong to prepare making this tomorrow morning. Really looking forward to making it especially after reading all the positive comments!
However, as I skim through the recipe, I am noticing that the recipe doesn’t ask for water/milk , asides from milk used making the tangzhong and the milk for the egg wash. Just wanted to make sure I am not missing anything? I made a loaf of bread today using about 280g of bread flour and that recipe required 190g of water.
Hi Esther, the hydration from the recipe is coming from the tangzhong and the large amount of eggs and butter. Additional milk would make the dough very sticky. Hope this helps and enjoy the baking tomorrow!
Did not refrigerate the dough but it still came out really good.
I like to add an extra 10g of water/milk for a softer texture
Could you use this recipe for a chocolate brioche or cinnamon inside the brioche ? How would you do that? My daughter made this and it was beautiful and delishious. Thx in advance.
Could you use this recipe for a chocolate brioche or cinnamon inside the brioche ? How would you do that? My daughter made this and it was beautiful and delishious. Thx in advance.
Hi Diane, yes I think so. For the chocolate brioche, you could try subbing 10% of the flour with cocoa powder, and adding a bit more water / milk to balance out the dryness. For cinnamon, you could roll cinnamon sugar into the middle when you are shaping the final loaf.
Hi there,
Thank you for such a detailed recipe! Trying it as I type. Can this recipe be doubled? thank you
Hi Sally, yes you can double this recipe and bake it in 2 tins.
Best,
Hali
Thank you for your prompt response!
Hi! This recipe looks amazing and I cant wait to try. I’m just wondering is there a specific reason it uses ap flour instead of bread flour? I’m just curious to know
Hi! AP flour leads to a slightly softer bite, and I also had a lot of requests for an AP flour recipe, instead of a bread flour recipe
Hi, could I use this for a babka situation?
Hi Mandisa, yes you can use this for a babka-style loaf