
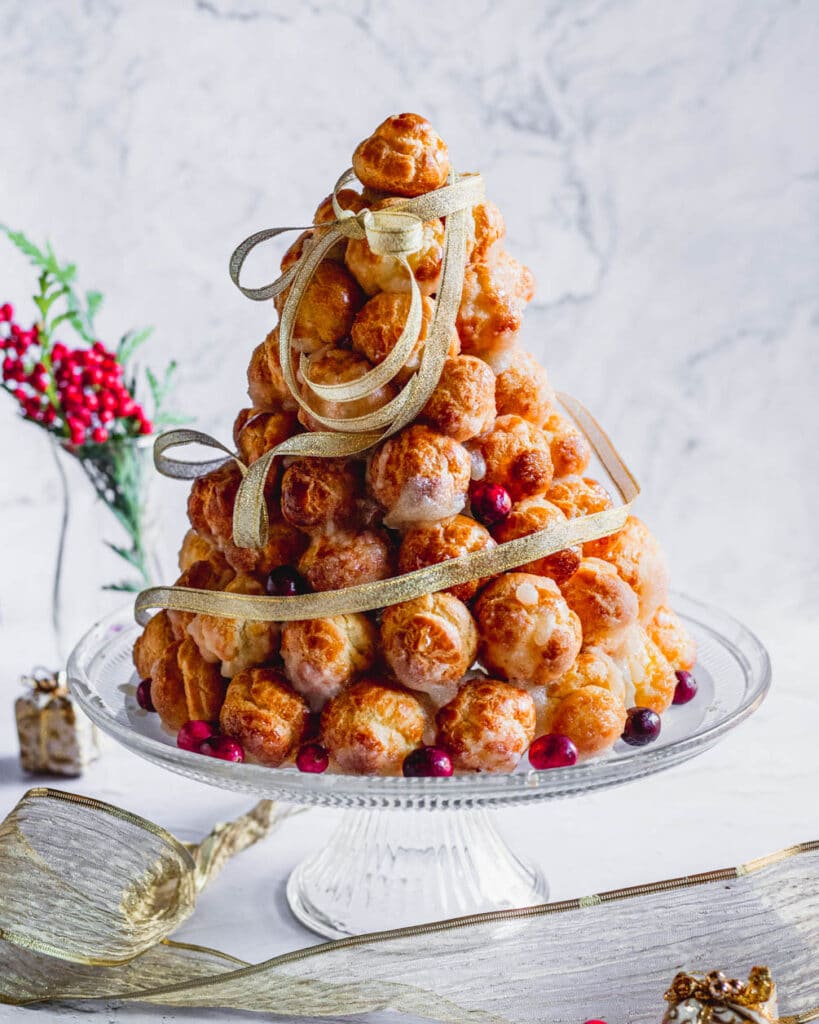
This tower of cream puffs is sure to impress. While it may seem intimidating, this pastry creation is made of 3 base components: choux pastry, vanilla pastry cream, and caramel. From the baking to free-form assembly, this guide will walk you through to croquembouche success!
Croquembouche, also known as Croque en bouche, which means “crunch in mouth,” is an absolute feat of pastry creation. It’s a traditional French pastry served at special celebrations, and it certainly is a special dessert! Made of cream puffs stacked and held together with caramel, it’s sure to make your dinner guests gasp with delight.
For the home chef, it can be an intimidating project to tackle. All those tiny cream puffs and having to glue them together with hot caramel – sounds like a potential kitchen nightmare.
But never fear, after tackling this beast, I’m here to walk through the process along with helpful tips and tricks. Rather than thinking of it as one giant project, break it down into 5 stages:
- Make the choux pastry puffs
- Make the vanilla pastry cream
- Fill the puffs
- Make the caramel
- Assemble the croquembouche
I like to split this over 2 days. On day 1, I make the choux pastry puffs and the vanilla pastry cream. On day 2, I fill the puffs, make the caramel, and assemble. Let’s walk through each step!
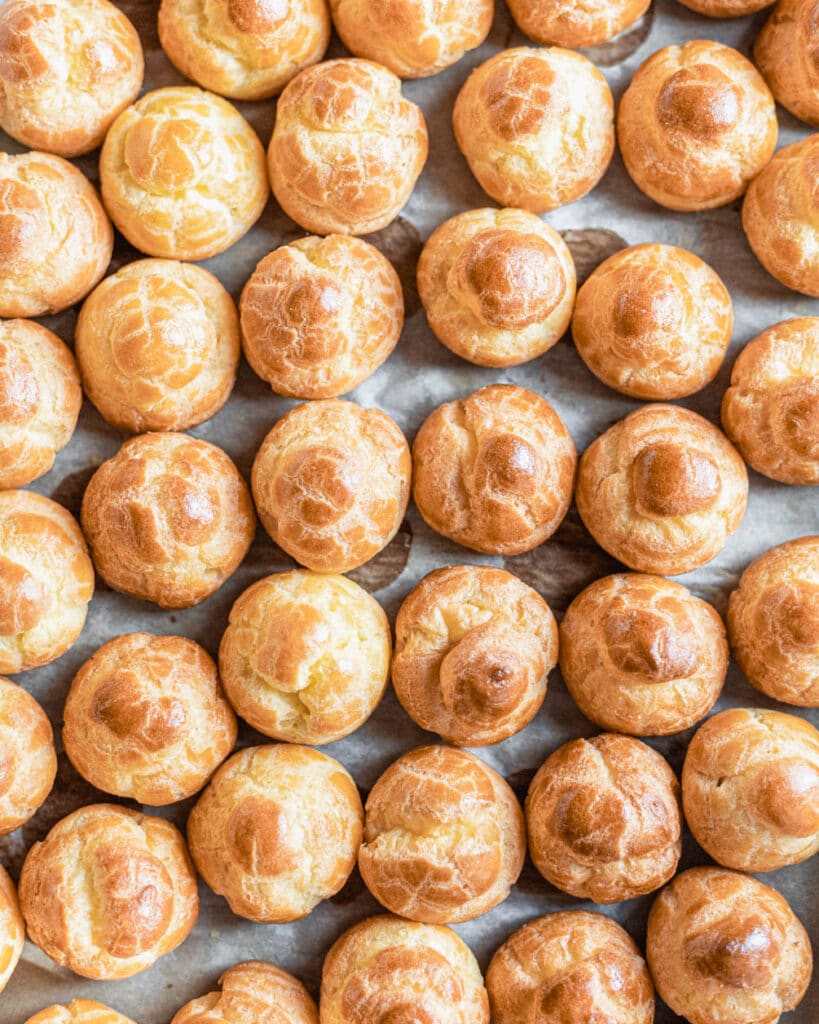
1 – Make the choux pastry puffs
We’re going to use the recipe from Sally’s Baking Addiction. First step is to make the choux pastry. We’ll mix butter, milk, water, salt, and sugar over medium heat before adding flour and whisking to create a thick paste. We’ll add beaten eggs to the paste to create a thick and pipe-able dough.
Tips for great choux pastry
- How many eggs you add to the pastry will always vary a tiny bit, so you’ll need to add in increments and observe the texture. I beat my eggs in a measuring cup and add slowly to the dough while the mixer is going. One way to tell if your dough has enough eggs is to take a scoop with your spatula and let it drop off. The remaining dough should form a “V” shape hanging off the spatula.
- Use a proper piping bag and tip. Normally I’m all for piping with a ziptop bag with the tip cut off, but having very regular, even choux is going to help with the overall construction of the croquembouche. I have this Ateco set from Amazon
- Do not open the oven while the pastry is baking. This will drop the oven temperature and deflate your pastry.
After you make the choux puffs, let them cool completely. Store in an airtight container at room temperature. Make up to 1 day ahead.
2 – Make the vanilla pastry cream
Next up is making the vanilla pastry cream. We’ll mix milk, butter, salt, and vanilla extract over the stove. In a separate bowl, we’ll beat together the eggs with sugar until light and fluffy, then add corn starch. We’ll temper the eggs by pouring the milk mixture into the eggs while whisking. Finally, we’ll pour it all back into the pot and cook until thickened.
Tips for great pastry cream
- It’s very important to temper your eggs. If you add the eggs directly to the hot liquid on the stove, they will scramble and leave you with chunky cream. Pouring the liquid slowly into the eggs while whisking helps bring the eggs up to temperature without scrambling them.
- If you find your cream to be a little lumpy, you can use a sieve to strain out any chunks.
- When you cover the cream for storage, make sure that the plastic wrap touches the surface of the cream. This prevents a film from forming.
After you make the pastry cream, cover with plastic wrap and place in the fridge. It needs at least 2 hours to chill but can be made up to 3 days in advance.
3 – Fill the puffs
I like to do this step the next day. We’ll take the wonderful smooth pastry cream and place it in a piping bag. To make piping easier, we’ll poke holes in the bottom of the puffs. From there, we’ll fit the piping bag nozzle into each puff and gently inject cream.
Tips for filling the puffs
- If you’re filling the puffs on the second day after baking, place them on a baking tray and dry them out for 5 minutes at 350°F. Dry puffs help with firmness and structure.
- Don’t overfill the puffs. Normally I fill my puffs ALL THE WAY, but when it comes to croquembouche puffs, I aim for 50% – 75% full. Very full puffs can lead to sogginess which is not great for structure.
4 – Make the caramel
Out of all the steps (except maybe assembly), I found this one the most difficult because I am just not good at making caramel. Caramel is a simple mixture of sugar and water that is heated to about 340°F. Adding water helps the sugar dissolve, and eventually it will boil off.
Tips for making caramel
- Stir at the beginning to help dissolve the sugar. After that, don’t stir as it can cause crystallization.
- Continually brush the sides of the pot with water. Again, this prevents crystals from forming on the sides of the pot. Once crystals have formed, they can easily spread to the rest of the caramel.
- Use a thermometer to check the temperature for done-ness. I didn’t have one handy, so I just eye-balled it, but I can confirm that using a thermometer is much easier and less anxiety-inducing.
- Have a bowl of ice water ready to dip the bottom of the pot in after your caramel is done. This cools down the mixture and prevents additional cooking.
- If you’re struggling with the caramel crystallizing, adding 2 tbsp of corn syrup at the beginning can help with stabilization.
Once the caramel is done, you’re ready to move on to your next step – assembly!
5 – Assemble the croquembouche
The puffs are filled, the caramel is ready – it’s now time to put it all together. First, we’ll trace the outline of a circle on a piece of parchment paper to use as a guide. Then, we’ll dip cream puffs in caramel and slowly build up the tower.
Tips for assembly
- Assemble the croquembouche on whatever you want to serve it on. It sounds obvious, but the final tower will be difficult to shift from one surface to another.
- Before assembly, arrange the cream puffs from largest to smallest. The larger ones will go at the bottom of the power.
- The caramel will periodically need to be reheated. When you feel it thickening up, place it back on the stove.
- Watch out for hot caramel and have a glass of cold water nearby. Be very careful, as the caramel will be very hot and can burn you! As you assemble, you may stick your finger in burning hot caramel. You may then instinctively want to stick your finger in your mouth. Resist the temptation, as then you will burns in your mouth as well. Instead, stick you finger into the cold water.
- If you don’t want to do a free-form croquembouche, you can make a mold out of poster board following this tutorial.
- When making a free form croquembouche, this is the process that worked best for me: drizzle caramel over the area that you’re stacking on as a kind of “mortar.” Then, dip the front and sides of the cream puff in caramel and adhere to the tower. Hold for a little bit as the caramel sets.
Overall things to watch out for
- Moisture and humidity are the enemy. Moisture and humidity will soften your choux pastry and make it harder for your caramel to set. This is why we don’t fill the pastry until right before assembling, because the moisture from the cream will cause the pastry to soften as well. If you live in a very humid environment, consider running a dehumidifier in your kitchen.
- For the best results, try not to be rushed for time. I promise there’s nothing worse than frantically trying to construct a cream puff tower while burning your fingers in hot caramel.
- After assembly, your tower will be good for about 5 – 8 hours before the puffs start to soften. So eat quickly!
If you’ve read all the way here, I think you’re ready to make a croquembouche!
Other pastry recipes to try:
If you make this recipe, please let me know! I would love to see your fabulous pastry towers. You can comment below or tag me on Instagram @halicopteraway.

Croquembouche
Equipment
- Hand or stand mixer
- Large mixing bowl
- spatula
- Medium saucepan
- Baking tray
- Parchment paper
- Piping bags and tips
- Pastry brush
Ingredients
Choux pastry
- 1 cup (230g) unsalted butter, cut into pieces
- 1 cup (240g) water
- 1 cup (240g) milk (whole or 2%)
- 1/2 tsp salt
- 4 tsp granulated sugar
- 2 cups (250g) all purpose flour
- 8 eggs, beaten
Vanilla pastry cream
- 2 cups (480g) whole milk
- 4 tbsp unsalted butter, cut into pieces
- 1/2 tsp salt
- 2 tbsp vanilla extract
- 5 egg yolks
- 1/2 cup (100g) granulated sugar
- 1/4 cup (25g) corn starch
Caramel
- 2 1/2 cups (500g) granulated sugar
- 1/2 cup (120g) water
Instructions
Day 1: Make the choux pastry
- Combine butter, water, milk, salt, and granulated sugar in a medium saucepan over medium heat, stirring until the butter has melted. Bring the mixture to a simmer and then reduce heat to low. Add all of the flour and stir until completely incorporated. The dough should be a thick ball. Press against bottom of sides of the pan for 1 minute to cook the flour and remove from heat.
- Place ball of dough into a large mixing bowl and allow to cool before adding eggs.
- With hand or stand mixer on low speed, slowly add the beaten eggs in 3 or 4 batches with 30 seconds between each. Pour in very slowly and observe the texture of the dough. At first it won't look like it's coming together, but will eventually become thick and glossy. Stop when you have a thick and pipeable texture. I like to save at least 1-2 tbsp of egg to use as the egg wash.
- Preheat oven to 400 degrees F. Line two baking sheet with parchment and lightly brush each sheet with water. The water helps create extra humidity in the oven, which helps with puffing.
- Fill your piping bag fitted with a 1/2 inch tip with the choux pastry dough. Pipe circles 1 inch in diameter. Space each circle 1 inch apart on the sheet.
- Bake for 15 minutes and then, making sure not to open the oven door, reduce oven temperature to 350 degrees F and bake for 5 – 10 more minutes until golden brown. Remove from oven and transfer to a cooling rack. Cool completely.
- Store choux puffs in an airtight container at room temperature until ready to assemble.
Day 1: Make the pastry cream
- Whisk egg yolks and sugar in a medium bowl until pale, light, and fluffy, about 3 minutes. Whisk in corn starch until fully incorporated.
- Mix milk, butter, salt, and vanilla extract in a medium saucepan over medium heat. Bring to a simmer.
- Slowly pour the milk mixture into the egg mixture, whisking constantly. Pour the mixture back into the saucepan and cook on medium heat, whisking constantly until the mixture is thick and the whisk marks hold. This should take about 2 minutes.
- Remove from heat and pour into a bowl. Cover with plastic wrap, making sure the surface of the custard touches the wrap. Chill for at least 2 hours and up to 3 days.
Day 2: Fill the puffs and prep for assembly
- When ready to assemble, remove the puffs from airtight containers. Spread on baking sheet and dry out for 5 minutes in the oven at 350°F. Let cool before filling.
- Poke a small hole in the bottom of each choux puff. Place the pastry cream in a piping bag fitted with a 1/4 inch tip. Fill each puff by placing the piping tip inside of the puff and gently squeezing in cream. Be careful not to overfill. You should have about 50 – 60 filled puffs.
- Arrange the puffs from largest to smallest. This will help with assembly.
- Trace a circle on a sheet of parchment paper that is 8 inches in diameter. Flip upside down so you can still see the circle through the paper. This will be a guide for assembly.
Day 2: Make the caramel
- Fill a large bowl with ice water. Place sugar and water in a medium saucepan over medium-high heat. Stir the sugar to dissolve. Do not stir again after the sugar has dissolved. Brush down the sides of the pan with water to prevent crystallization. After the caramel is an amber color (about 340°F), remove from the stove and place the pan in the cold water to prevent further cooking.
Day 2: Assemble
- Fill a glass with cold water and place next to your work station in case of caramel burns. If your fingers touch the hot caramel, dip them into the water.
- Use the largest puffs for the bottom of the croquembouche. Dip the front and one side of a cream puff into the caramel, being careful not to burn your fingers. Stick the puff onto the sheet, with the top of the puff facing out. It should be just within the edge of the circle. Dip another puff into the caramel, coating the front and two sides. Place the puff so that one side sticks to the other puff, and the other side sticks to the parchment paper. Repeat until you close the circle, angling the puffs slightly inwards.
- Repeat with the second layer, using at least 1 less puff. Before placing each puff, drizzle caramel on top of the first layer to use a "mortar." Try to place puffs in the empty spaces between puffs in the first layer for structural stability. I find it helpful to hold the last puff I place while dipping the next puff to help the caramel set up.
- Continue to build layers, using less puffs for each layers. You may periodically need to reheat the caramel. Finish the tower with a single puff. You should have 8 layers.
- To decorate, you can make caramel strands by letting the caramel cool in the pan until thickened. It should form a thread when you lift it with a fork. Dip a fork in the caramel and spin around the croquembouche to encase in caramel threads. Alternatively, decorate with ribbon and fresh cranberries.
- The croquembouche will last for 5 – 8 hours before it begins to soften.
Notes
- The choux pastry recipe makes about 80 – 90 puffs. You may have 20 – 30 puffs left unfilled, which you won’t need for the final construction. I suggest cutting them in half and enjoying with ice cream.